
Ever find yourself staring at a pack of split chicken breasts and wondering how to make them shine? You’re not alone. This split chicken breast recipe is one of those underrated gems that delivers big on flavor, simplicity, and satisfaction. Whether you’re planning a cozy family dinner or just want something juicy, crispy, and packed with seasoning, this dish checks all the boxes.
When time is tight but expectations are high, this recipe rises to the occasion—every. single. time. With the skin-on, bone-in chicken breast, you get that golden, crackly texture on the outside while locking in all the moisture inside. Add a few pantry staples and a hot oven, and you’re on your way to a flavorful chicken recipe that feels like a little dinnertime magic.
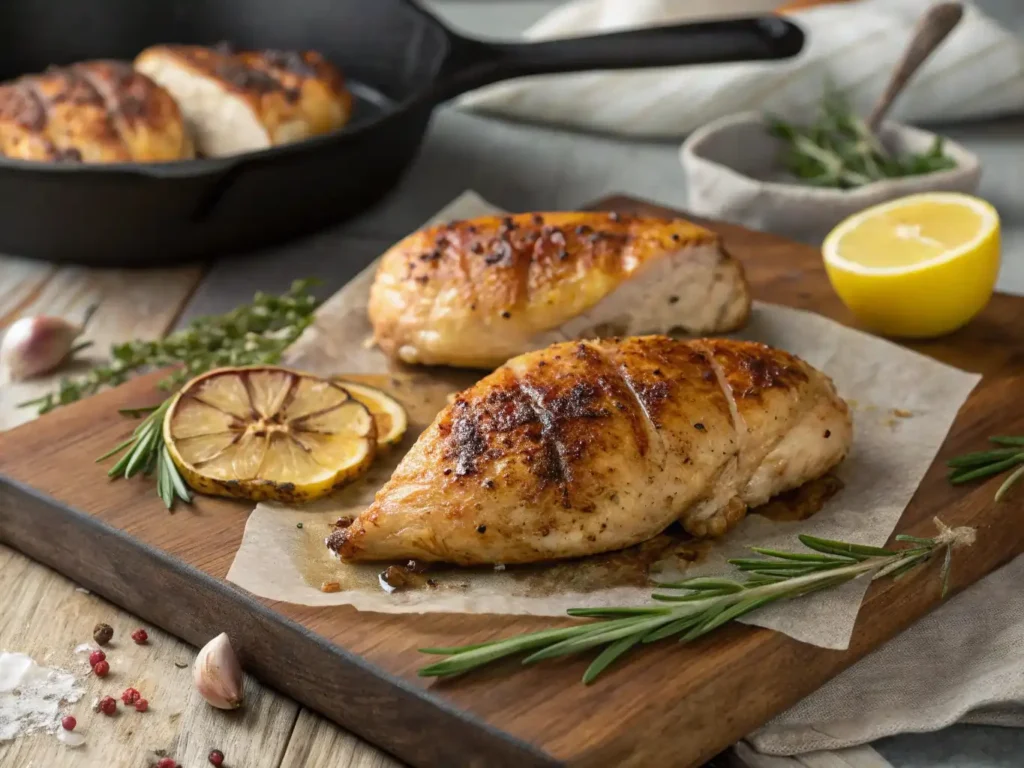
Ready to transform a humble cut into a restaurant-worthy meal? Let’s get started.
Table of Contents
Key Benefits
When it comes to easy, impressive meals, this split chicken breast recipe is a total game-changer. It’s the kind of dish that looks and tastes like you spent hours in the kitchen—but really, it’s all about smart seasoning and simple techniques. Here’s why you’ll love it:
- Flavor-packed with minimal effort
Bone-in, skin-on cuts guarantee melt-in-your-mouth texture and layers of flavor that cling to every forkful, The skin crisps up beautifully while locking in moisture underneath. - Perfect for busy weeknights or special dinners
Whether you’re feeding a hungry family or hosting friends, this oven baked chicken brings comfort and elegance to the table—without stress. - Highly customizable
Love bold spices? Go smoky with paprika or chipotle. Craving something light? Try lemon and fresh herbs. Customize this recipe endlessly with flavors and ingredients you love most. - Budget-friendly and protein-rich
Split chicken breasts are affordable and filling, making this meal a smart choice for nutritious, balanced eating. - One pan, easy cleanup
Everything roasts in the same dish, so you get big flavor with minimal mess—perfect for those nights when you want good food without the pile of dishes.
Designed for all skill levels, this dish simplifies gourmet results while letting your creativity (and taste buds) shine. Let’s keep things simple, flavorful, and totally satisfying.
Ingredients
Let’s keep things simple, flavorful, and pantry-friendly. Below are all the essentials you’ll need to bring this split chicken breast recipe to life. Each ingredient plays a key role in making your chicken tender, juicy, and downright crave-worthy.
Main Ingredients
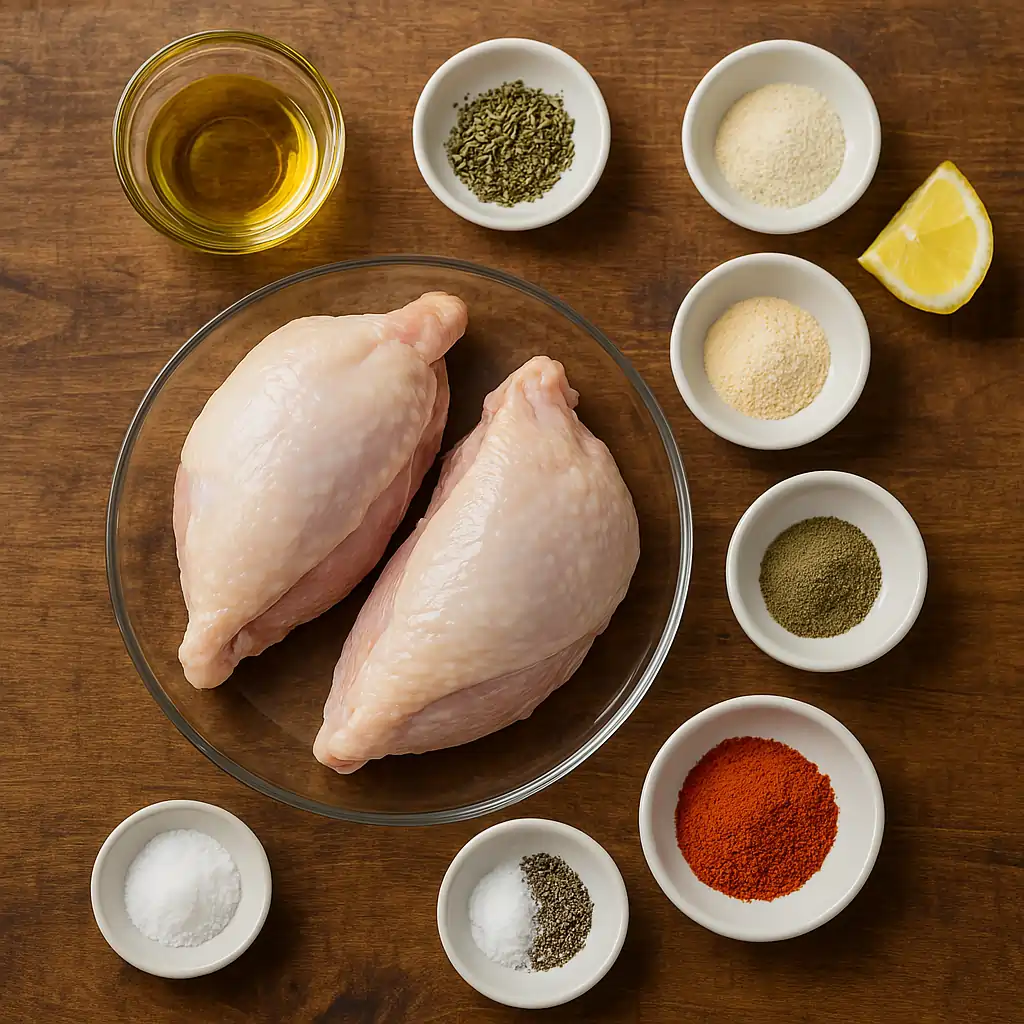
- 2 split chicken breasts (bone-in, skin-on)
Choose uniformly sized cuts to guarantee even doneness and lock in natural juices. - 2 tablespoons olive oil
Balances a crisp exterior with flawlessly tender, melt-in-your-mouth meat. - 1 teaspoon garlic powder
Adds a rich, savory base that pairs beautifully with roasted chicken. - 1 teaspoon onion powder
Layers in a gentle sweetness, deepening the flavor profile with subtle richness. - 1 teaspoon paprika (smoked or sweet)
Infuses the meat with sun-kissed color and a gentle kiss of wood-fired flavor. - ½ teaspoon dried thyme or rosemary
Adds a touch of earthiness that works especially well with oven roasting. - Salt and black pepper, to taste
Always essential—don’t skimp on seasoning here.
Optional Flavor Boosters
- Fresh lemon wedges – For a bright finish after baking.
- Red chili flakes – A pinch of heat to awaken your palate.
- Minced garlic or fresh herbs – Toss in during the last 10 minutes of roasting for extra aroma and flavor.
Pro Tip:
For maximum flavor and crunch, start by patting the chicken dry—moisture-free skin is the secret to success. This simple step helps the skin-on chicken breast crisp up beautifully in the oven—no sogginess here.
Now that your ingredients are prepped, you’re one step closer to the juiciest, most flavorful oven baked chicken you’ve ever had. Let’s keep that momentum going in the next step!
How to Make Split Chicken Breast Recipe
Ready to make the juiciest, most flavorful split chicken breast ever? Follow these step-by-step instructions for a foolproof, no-fuss dinner that’s big on taste and low on stress. Think of this as your personal guide—simple, clear, and packed with helpful tips along the way.
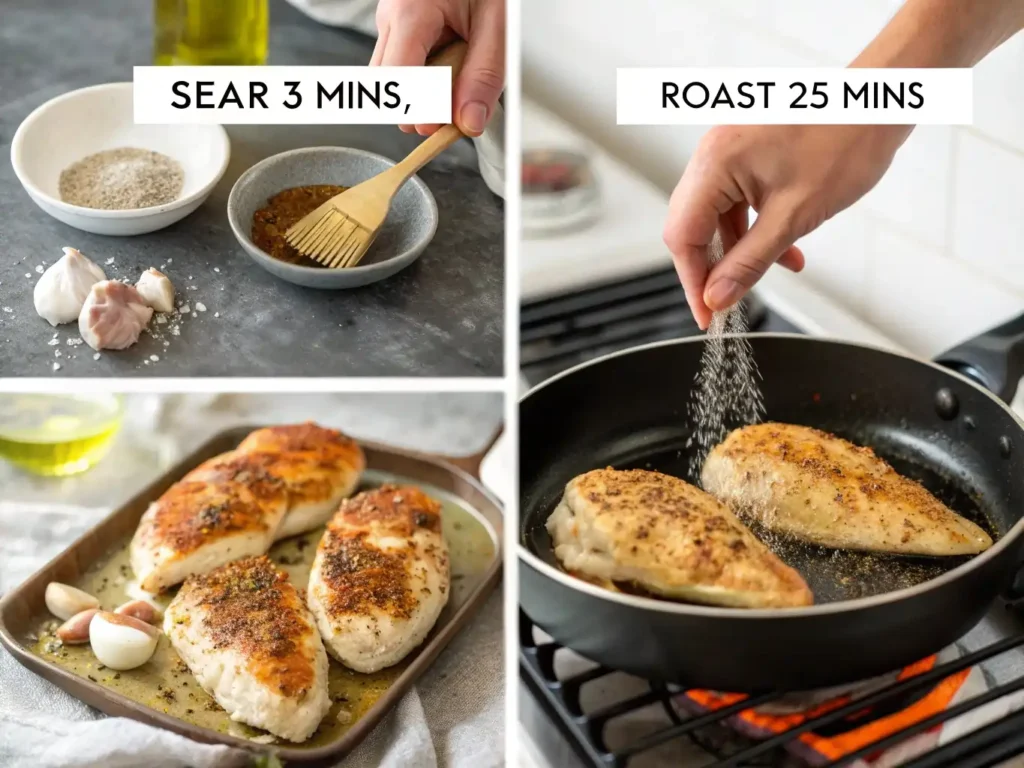
1. Preheat your oven
Set your oven to 425°F (220°C). A higher temperature ensures the skin-on chicken breast crisps up beautifully while keeping the meat juicy inside.
2. Prep the chicken
- Use paper towels to dab away moisture from the chicken, ensuring a flawless base for seasoning and roasting. This helps the skin brown and crisp rather than steam.
- Position the chicken in a greased roasting pan, ensuring the crispy skin faces upward.
3. Season generously
In a small bowl, mix together:
- 2 tbsp olive oil
- 1 tsp garlic powder
- 1 tsp onion powder
- 1 tsp paprika
- ½ tsp dried thyme
- Salt and pepper to taste
Brush the mixture evenly over the chicken, making sure to get under the skin where possible. That’s where all the flavor really soaks in.
4. Roast to perfection
- Place the dish in the oven and bake uncovered for 35–45 minutes.
- Check for doneness using a meat thermometer—the internal temp should hit 165°F (74°C) at the thickest part of the breast.
Tip: If the skin isn’t quite crispy at the end, switch to broil for the last 2–3 minutes, watching closely to avoid burning.
5. Rest before serving
Once done, let the chicken rest for 5–10 minutes before slicing. This keeps the juices locked in and the meat perfectly tender.
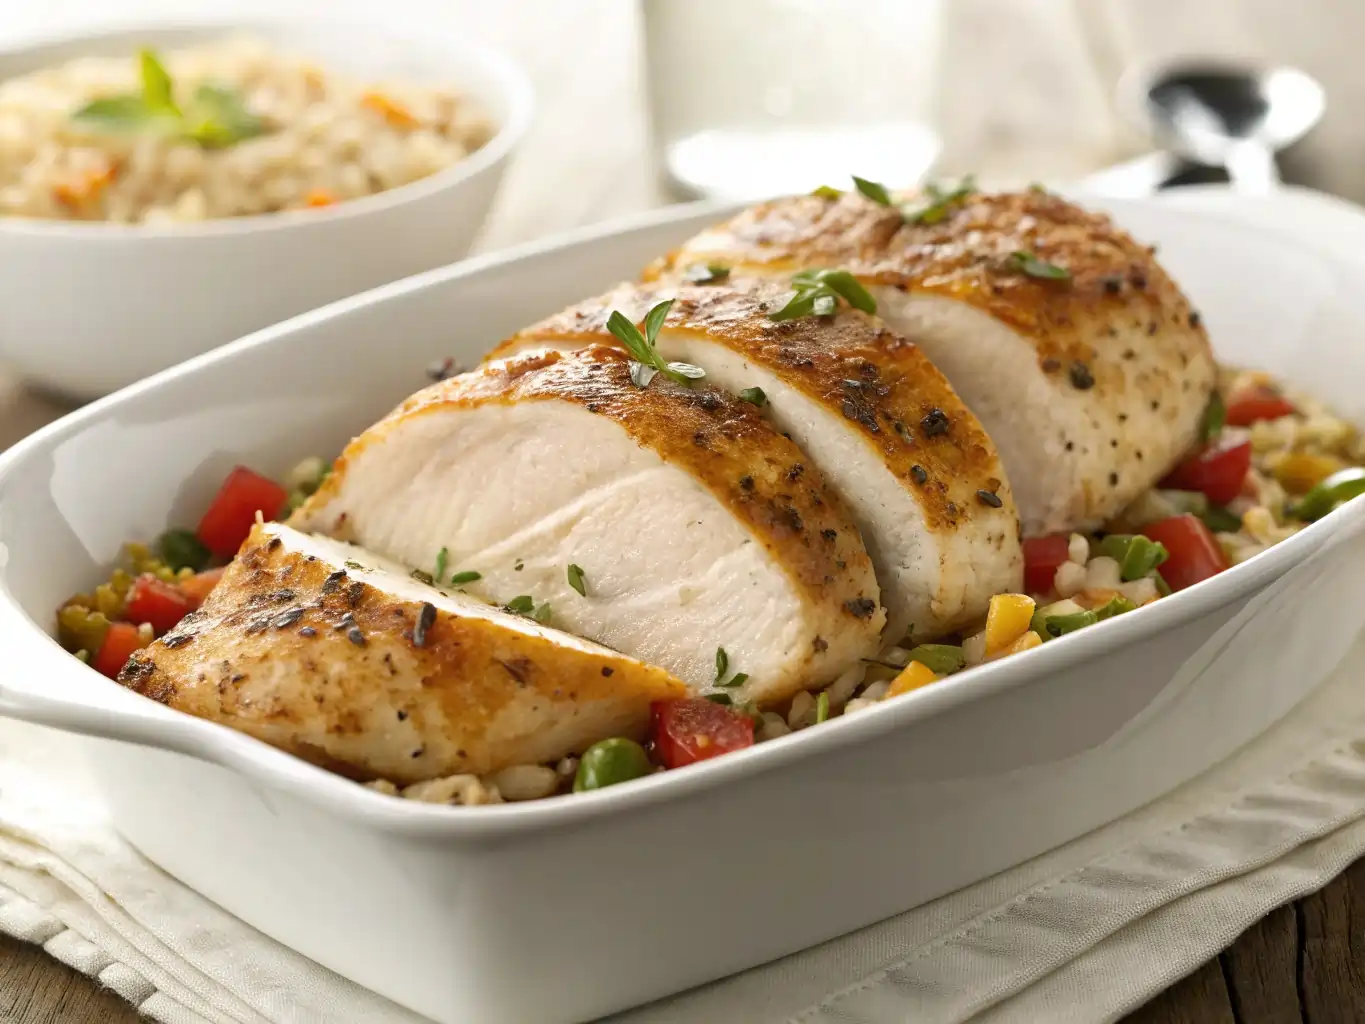
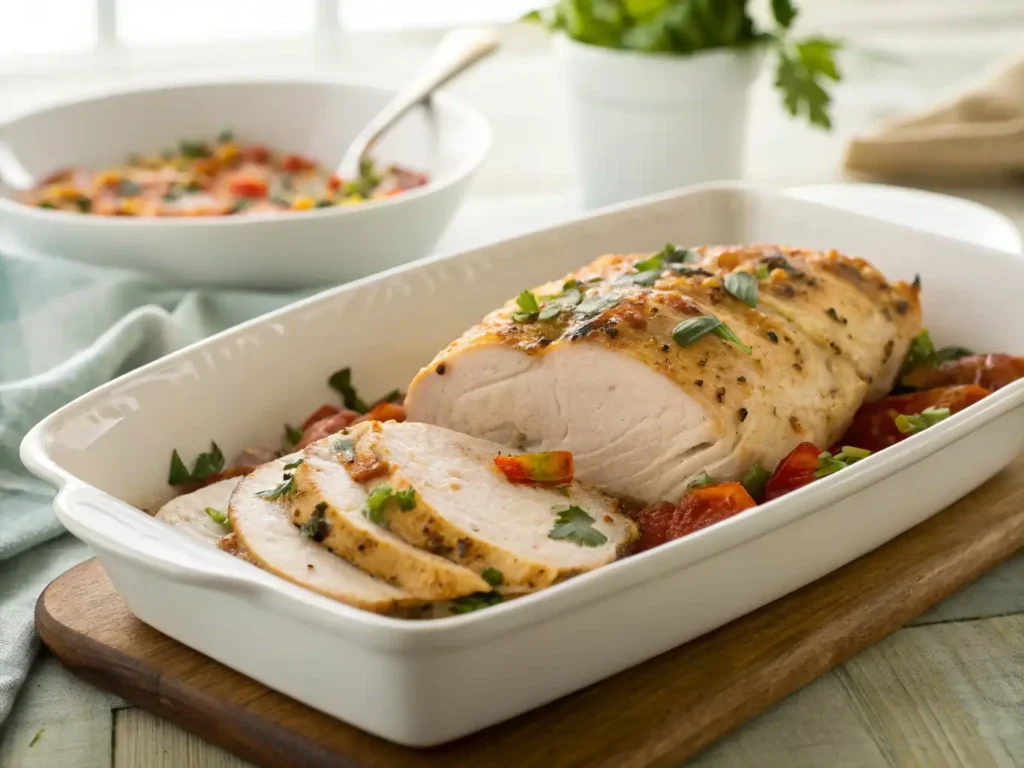
You did it! This oven-baked split chicken breast is now golden, juicy, and ready to impress. Whether it’s your first time roasting chicken or your hundredth, this process is easy to master—and always worth it.
Pro Tips and Variations
Craving a gourmet twist on your go-to split chicken breast recipe? These tips and creative twists will help you tailor the dish to your taste while ensuring each bite is tender, juicy, and full of flavor. Think of this as your recipe upgrade toolkit.
Pro Tips for Perfect Chicken Every Time
- Always dry the skin before seasoning
Moisture is the enemy of crisp skin. Press paper towels onto the chicken until fully dry—crucial for crispy skin. - Don’t skip the rest period
5-minute post-bake rest ensures moist, fork-tender results. Juices rebalance for flawlessly moist, never-dry meat. - Use a meat thermometer
Guarantee safe, juicy results with a thermometer-checked internal temp of 165°F (74°C)—no room for error. Lock in juiciness and nail the perfect cook with this failproof technique. - Elevate with a wire rack
A wire rack over a baking sheet lifts the chicken, allowing heat to circulate underneath for uniformly crispy, blistered skin. - Baste halfway through roasting
Baste the chicken with its own savory juices halfway into cooking for a succulent interior and richly seasoned crust. Locks in succulence and amplifies the dish with a vibrant, savory richness.
Delicious Variations to Try
- Lemon Herb Chicken
Swap paprika for fresh lemon zest and use thyme, rosemary, or oregano for a Mediterranean twist. Layer lemon slices over chicken while baking for a zesty, aromatic lift. - Garlic Butter Chicken
Melt 2 tablespoons of butter with minced garlic and pour it over the seasoned chicken before roasting. The flavor? Out of this world. - Spicy Cajun Style
Mix in Cajun seasoning or chili powder to give your chicken a bold, smoky kick. Great for serving with rice or cornbread. - Maple Mustard Glaze
Create a sticky, golden glaze by mixing maple syrup and Dijon, then coat the chicken in the final oven minutes to elevate its flavor profile.
Whether you’re keeping it classic or adding your own flair, these tips and variations will help you create a baked split chicken breast that’s anything but ordinary. It’s all about making it yours—while keeping things simple, flavorful, and foolproof.
Serving Suggestions
So, your split chicken breast recipe is fresh out of the oven—golden, juicy, and full of flavor. Craft your dish with artful precision—every element placed to delight the eyes as much as the palate. Whether you’re going for cozy comfort or weeknight elegance, here are a few delicious ideas to round out your meal beautifully.
Pair with Comforting Sides
- Garlic mashed potatoes – Creamy and classic, they soak up the flavorful chicken juices like a dream.
- For a hearty accompaniment, roast a medley of seasonal picks (carrots, Brussels sprouts, or sweet potatoes) with olive oil and herbs until crisp-tender.
- Buttered rice or wild rice blend – An easy, no-fuss pairing that complements the savory spices.
- Reinvent mac and cheese by amping up the richness—think smoked gouda, caramelized onions, or a golden breadcrumb crust for textural nirvana.
Keep It Fresh with Lighter Options
- Garden salad with vinaigrette – A crisp salad balances the richness of the chicken perfectly.
- Lightly steamed green beans or asparagus – Finish with a spritz of lemon to awaken the flavors.
- Quinoa or couscous – These grain-based sides add texture and soak up flavor without feeling heavy.
Ideas for Leftovers
Don’t let that juicy baked split chicken breast go to waste—transform it:
- Shred it for sandwiches or wraps with lettuce, tomato, and a smear of aioli.
- Slice it over a Caesar salad for a quick, protein-packed lunch.
- Mix tender chicken with pasta coated in silky garlic butter or a lively, sun-ripened tomato blend.
- Stuff it into tacos or burritos for a weeknight twist on Mexican night.
Whether you’re serving this for a casual family dinner or a more dressed-up occasion, this chicken pairs well with just about anything. Stick to basics, allow the dish’s core flavors to captivate, and relish every forkful of honest, unfussy goodness.
Conclusion
Congratulations! You’ve just created a split chicken breast that’s crispy on the outside, juicy on the inside, and packed with flavor. Whether you’re a seasoned cook or just starting, this simple yet delicious recipe proves that with a few key ingredients and the right technique, you can make a meal that’s sure to impress.
This oven-baked split chicken breast is perfect for any occasion, from weeknight dinners to weekend gatherings. It’s a dish that’s both easy to prepare and versatile enough to pair with whatever sides you’re craving. Plus, the leftovers are just as fantastic, giving you even more reason to love it.
Key Takeaways:
- Simple Ingredients, Big Flavor – With just a few pantry staples, you can create a truly satisfying meal.
- Oven Magic – Baking the chicken ensures that it’s juicy, tender, and full of crispy skin goodness.
- Endless Pairing Options – Whether you go for comfort food or something lighter, this chicken pairs beautifully with a wide variety of sides.
So, next time you’re in the mood for a flavorful, easy-to-make chicken dinner, this split chicken breast recipe is your go-to. And, with all the tips and variations shared here, you can make it your own every time you cook it. Enjoy your meal, and happy cooking!
FAQs
Have questions about making the perfect split chicken breast? Don’t worry, I’ve got you covered. Here are some of the most common questions I get, along with answers to help ensure your chicken turns out perfectly every time.
1. Is boneless, skinless chicken a viable swap here?
Absolutely! If you prefer boneless, skinless chicken breasts, you can still follow the same method. However, boneless chicken may cook a bit faster, so be sure to adjust the cooking time. You’ll want to cook until it reaches an internal temperature of 165°F (74°C) to ensure it’s fully cooked.
2. How do I get crispy skin on my split chicken breast?
Prep work is the unsung hero behind every bite of crispy-skin glory. Pat the skin dry before seasoning, and consider using a rack to elevate the chicken as it bakes. Uniform heat exposure = flawlessly crispy skin, no soggy spots. For an ultra-crunchy crust, finish the chicken under the broiler for 2–3 minutes.
3. Is this dish suitable for prepping ahead?
Yes! Season and store the chicken ahead—it’ll marinate beautifully, making dinnertime a breeze. Season and store the split chicken breasts in the fridge for up to 24 hours before baking. Time is your ally here—the seasoning will infuse the meat, amplifying savoriness in every bite. However, it’s best to bake the chicken fresh for the crispiest skin and juiciest meat.
4. What should I serve with split chicken breast?
A versatile centerpiece, it shines alongside bold, light, or hearty accompaniments. For comfort, go for mashed potatoes or roasted vegetables. If you want something lighter, a fresh salad or quinoa would complement the dish perfectly. Feel free to get creative based on what you’re in the mood for!
5. How do I store leftovers?
Keep leftovers fresh in an airtight fridge container for up to 72 hours. Revive crispy skin by reheating the chicken in the oven for 5–10 minutes. You can also shred the leftover chicken for use in tacos, sandwiches, or soups.
6. Can I freeze split chicken breast?
Yes, you can freeze the chicken after it’s cooked. Allow it to cool completely, then wrap it tightly in plastic wrap and foil or place it in a freezer-safe bag. Freeze for up to 90 days—flavor and texture remain intact. Thaw overnight in the fridge; oven-reheat to revive crispiness and warmth.
Got more questions? Drop them in the comments! I’m here to help you make this split chicken breast recipe your go-to weeknight meal. Happy cooking!
Share Your Experience
There are no reviews yet. Be the first one to write one.