
Sourdough bread recipe lovers, this one’s for you. If you’ve been craving a crusty, golden loaf with a soft, chewy crumb and rich flavor—look no further. This is the sourdough bread recipe that simplifies the entire process. Simple and direct—no autolyse, no preferments. Just pure flour, water, salt, and your lively wild yeast starter guiding the process step by step.
We’ll walk you through everything, from reviving your sourdough starter to baking your first loaf with confidence. Perfect for first-time bakers or those refining their craft, this recipe delivers clear guidance, reliable results, and bakery-worthy bread straight from your own kitchen.
You’ll also discover the science behind natural fermentation, tips to get the perfect rise, and what sets sourdough apart from regular bread. It’s more than baking—it’s a lifestyle shift to better, healthier bread made with intention.
Get ready to dive into the ultimate sourdough bread recipe you’ll be proud to bake at home.
Table of Contents
What Is Sourdough Bread and Why It’s So Popular?
What Makes Sourdough Different from Other Breads
A sourdough bread recipe begins with only three essentials: flour, water, and salt. But what makes it unique is that it doesn’t rely on commercial yeast. Rather than commercial yeast, it’s built on a naturally fermented mix of flour and water known as a sourdough starter. This wild yeast gives your loaf a naturally leavened rise, a deep flavor, and a chewy, rustic texture.
Unlike supermarket bread, a true sourdough bread recipe relies on slow fermentation, which allows the dough to develop its character over time. That extended rise gives you:
- A crusty, golden-brown exterior
- A soft, open crumb with perfect air pockets
- A signature tangy flavor that comes from natural lactic acids
The simplicity of a sourdough loaf is what makes it magical. It’s less about rushing and more about patience and the craft itself. This is why many beginner bakers fall in love with the challenge of a good sourdough bread recipe—it teaches you to slow down, follow nature’s lead, and create something nourishing with your hands.
The History and Health Benefits of Sourdough Bread
The sourdough bread recipe isn’t a new trend—it dates all the way back to ancient Egypt. Long before commercial yeast became the norm, sourdough was the go-to method for leavening bread across cultures.
Today, sourdough is making a huge comeback, and not just because of its flavor. A properly fermented sourdough bread recipe can offer a range of health benefits:
- Lower glycemic index than store-bought white bread
- Easier digestion, especially for those with mild gluten sensitivities
- Improved nutrient absorption, due to natural fermentation
Is sourdough actually healthier than regular bread? Many studies suggest it is. The fermentation process breaks down gluten and phytic acid, unlocking nutrients and improving gut health.
And the best part? This type of bread contains no artificial preservatives, additives, or unnecessary sugar. Just clean ingredients and old-world baking technique.
The Science Behind a Sourdough Starter
Sourdough Starter Explained: What It Is and How It Functions?
Every great sourdough bread recipe begins with a strong starter. A sourdough starter is a live fermented culture made by combining flour and water, allowing wild yeast and beneficial bacteria (like lactobacilli) to grow. Unlike commercial yeast, which is a single strain of yeast, a starter contains a diverse ecosystem of microorganisms that not only make your dough rise but also develop deep, rich flavors.
Here’s what happens in your starter:
- Wild yeast feeds on the natural sugars in the flour, producing carbon dioxide that creates bubbles in your dough.
- Lactic acid bacteria thrive in the mix, creating the sour flavor and improving the bread’s digestibility.
- As your starter ferments, it naturally leavens the bread without the need for store-bought yeast.
This natural fermentation is what makes the sourdough bread recipe different, healthier, and more flavorful than typical white or whole wheat bread made with instant yeast.
Yeast vs. Wild Yeast: Understanding Fermentation in Sourdough
Let’s break it down simply: commercial yeast (like instant or active dry yeast) is fast. It delivers a fast lift with consistent, reliable outcomes. But it lacks the flavor and depth that a wild yeast bread provides.
Wild yeast, on the other hand:
- Grows naturally from your environment
- Works slower, allowing more time for flavor development
- Is more sensitive to temperature and feeding schedules, but produces amazing results when properly cared for
That’s the beauty of the sourdough bread recipe—it uses wild fermentation, which not only leavens the dough but also enhances the bread’s taste, texture, and health benefits.
This slower, more traditional method is what gives sourdough bread its signature open crumb and deeply caramelized crust. Additionally, fermentation helps break down gluten, which often makes the bread gentler on digestion for many.
How to Create and Feed Your Sourdough Starter
Step-by-Step Method to Create a Starter from Scratch
If you’re starting from zero, you can build your own sourdough starter at home using just two ingredients: flour and water. This foundational step is what separates a true sourdough bread recipe from all others—it’s homemade from the very beginning.
Here’s how to start:
| Day | Instructions |
|---|---|
| Day 1 | Mix 60g whole wheat flour with 60g water in a clean glass jar. Stir well, cover loosely, and leave at room temperature. |
| Day 2 | You may or may not see bubbles. Discard half. Add 60g all-purpose flour and 60g water. Stir and cover again. |
| Days 3–6 | Repeat the process every 24 hours: discard half, feed with equal parts flour and water. By day 4 or 5, bubbling should be active. |
| Day 7 | Starter should double in size within 4–8 hours of feeding. If it does—congrats, your sourdough starter is ready to use! |
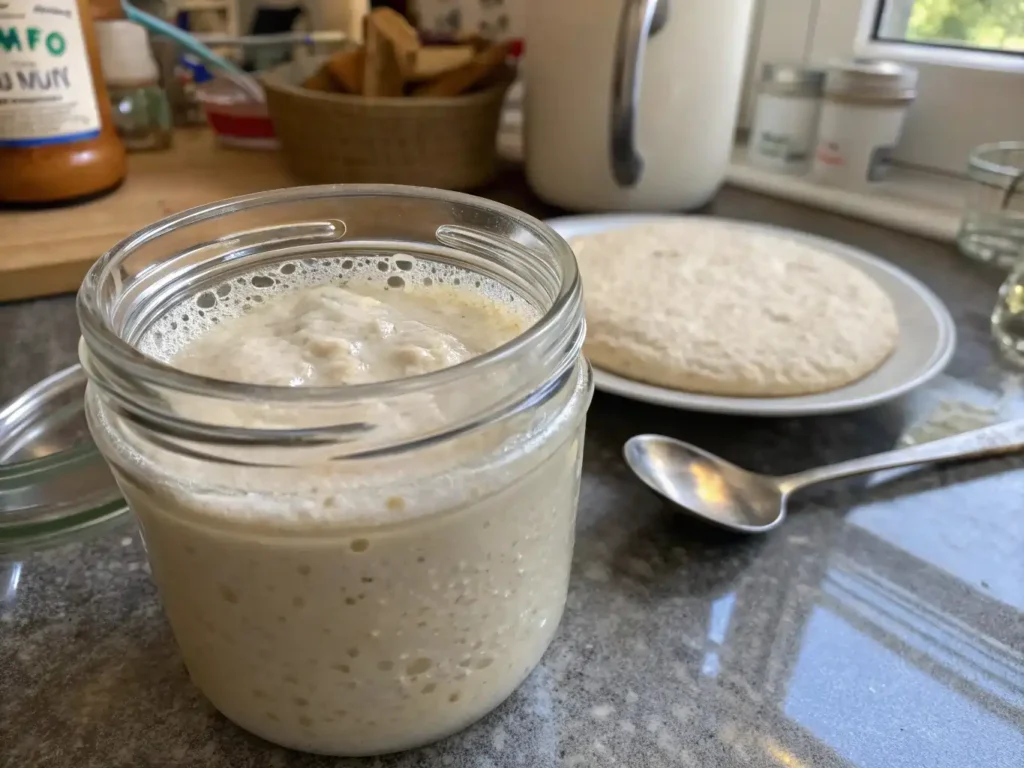
A healthy starter smells tangy (like yogurt or beer), shows visible bubbles, and should rise predictably after feeding.
Don’t feel ready to commit to creating your own? You can also purchase a reliable starter online from sites like Breadtopia, King Arthur Flour, or Cultures for Health. This gives you a strong, established culture to start baking your sourdough bread recipe faster.
Caring for Your Sourdough Starter: Feeding and Keeping It Strong
Your starter is like a low-maintenance pet: feed it regularly, and it will stay happy and strong. Once it’s established, maintaining it is easy.
Daily use? Keep it on the counter:
- Feed it once a day: discard about 80%, then add equal parts water and flour by weight.
- For instance: keep 50g of starter, then mix in 50g of flour and 50g of water.
Infrequent baking? Store it in the fridge:
- Feed it, let it rise, then refrigerate. It can rest inactive for as long as 2 to 3 weeks.
- Before using, feed it twice at room temp until it becomes active and bubbly again.
Tip: Always mark the level of the starter with a rubber band so you can easily spot if it has doubled in volume—a sure sign it’s ready to bake.
Regular feeding ensures a strong, reliable rise in your sourdough bread recipe and keeps bad bacteria from taking over.
Know When Your Sourdough Starter Is Ready
Signs Your Starter Is Mature and Active
Before diving into your first sourdough bread recipe, you need to make sure your starter is mature enough to leaven dough properly. Using an immature or weak starter is one of the biggest mistakes beginners make with sourdough bread—it leads to flat, gummy, or under-risen loaves.
These are the main indicators that your starter is ready for baking:
- Doubles (or triples) in size within 4–8 hours of feeding
- Shows plenty of bubbles on the surface and throughout the jar
- Has a pleasant, slightly tangy smell (not foul or musty)
- Passes the “float test”: a spoonful dropped in water floats
Tip: Once fed, use a rubber band or tape to mark the starter’s height on the jar. This gives a visual cue when it has doubled.
Timing matters too: you want to use the starter when it’s at peak activity, not before or after. Typically, this means baking 4–6 hours after its last feeding.
Inconsistent rise or flat bread? It may be because your starter was past its peak or too young when used. Strengthen it with more frequent feedings.
Common Problems and How to Fix a Weak Starter
Even the best intentions can go sideways. If your starter isn’t rising well or smells off, don’t panic—it’s salvageable.
Problem: Starter isn’t doubling in volume
- Solution: Feed it twice a day at room temp for a few days. Use unbleached flour and filtered water.
Problem: Sour smell is overpowering or it smells like acetone
- Solution: Discard more and feed more often. This means it’s hungry.
Problem: A layer of dark liquid (hooch) forms on top
- Solution: This is normal. Just stir it in or pour it off, and increase feeding frequency.
Problem: Mold or pink/orange streaks
- Solution: Discard immediately. Mold = starter has gone bad and isn’t safe to use.
Consistency is key. The more consistent your feeding schedule, the stronger your starter—and the more reliable your sourdough bread recipe results will be.
Sourdough Bread Recipe: Step-by-Step Guide
Ingredients and Equipment You’ll Need
Before you start baking your first loaf, gather the essentials. This no-fuss sourdough bread recipe is crafted to be easy, practical, and beginner-friendly.
Basic Ingredients:
| Ingredient | Quantity | Notes |
|---|---|---|
| Bread flour | 500g | You can also use all-purpose flour |
| Water | 375g (75% hydration) | Filtered or spring water works best |
| Salt | 10g | Fine sea salt or kosher salt |
| Active sourdough starter | 100g | Must be bubbly and recently fed |
Tools You’ll Need:
- Kitchen scale (for accuracy)
- Large mixing bowl
- Dough scraper
- Proofing basket or bowl with cloth
- Dutch oven or heavy lidded pot
- Parchment paper
- Razor blade or bread lame (for scoring)
- Clean kitchen towel or plastic wrap
Having the right tools makes this sourdough bread recipe smoother and helps you achieve consistent results.
Full Sourdough Bread Recipe (Mixing, Proofing, Baking)
This method leaves out autolyse and preferments, offering a simple and direct way to bake artisan sourdough in your own kitchen.
Step 1: Mix the Dough (Evening)
In a big mixing bowl, combine 100g of active starter with 375g of water and 500g of flour, stirring until the ingredients come together. Let it rest for 30 minutes (this is called a “fermentation kickstart”).
Add 10g of salt, then use the “stretch and fold” method in the bowl, mixing until the dough firms up a bit. Cover with a damp towel.
Step 2: Bulk Fermentation (Evening)
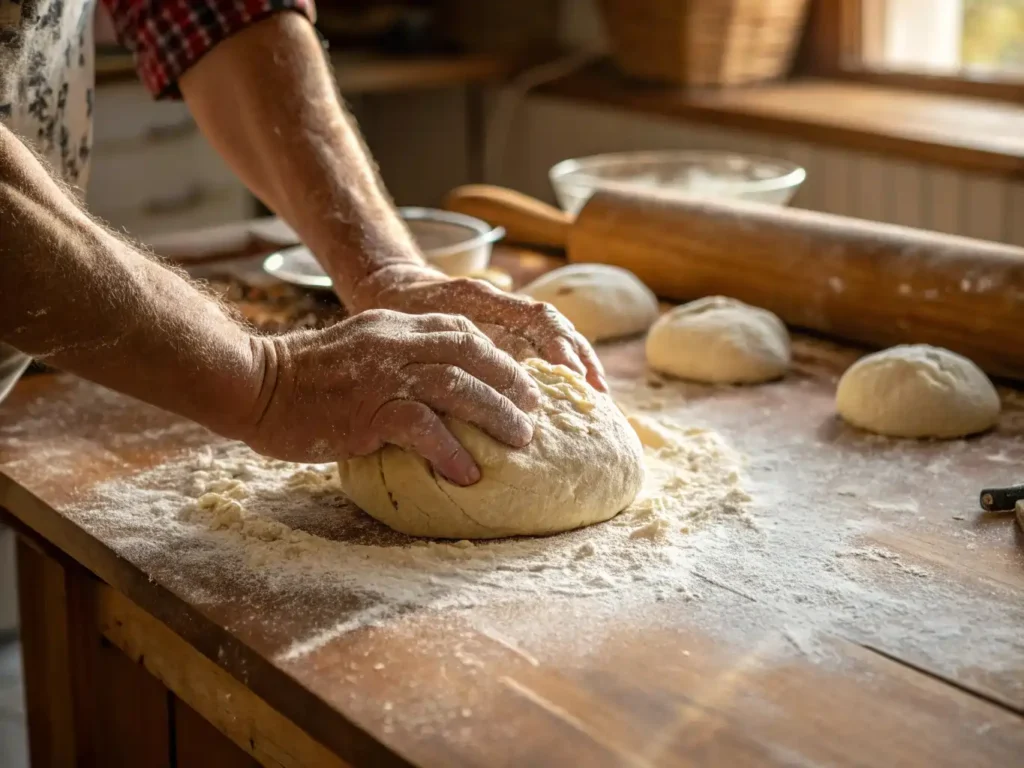
Allow the dough to sit at room temperature for about 4 to 5 hours. Every 30 minutes during the first 2 hours, do a series of stretch and folds (about 4 total rounds). This builds gluten structure without kneading.
Let the dough finish fermenting until it’s puffed up, jiggly, and slightly domed.
Step 3: Shaping the Dough (Late Evening)
Gently turn the dough onto a floured surface. Shape it into a tight round or oval using your bench scraper.
Transfer the dough to a floured proofing basket or a towel-lined bowl. Cover and refrigerate overnight (12–16 hours).
Step 4: Bake Your Bread (Next Morning)
Preheat the oven and Dutch oven side by side at 475°F (246°C), letting them fully heat for 45 minutes.
Remove the dough from the fridge. Place it on parchment paper, score the top using a sharp blade, and transfer it to the hot Dutch oven.
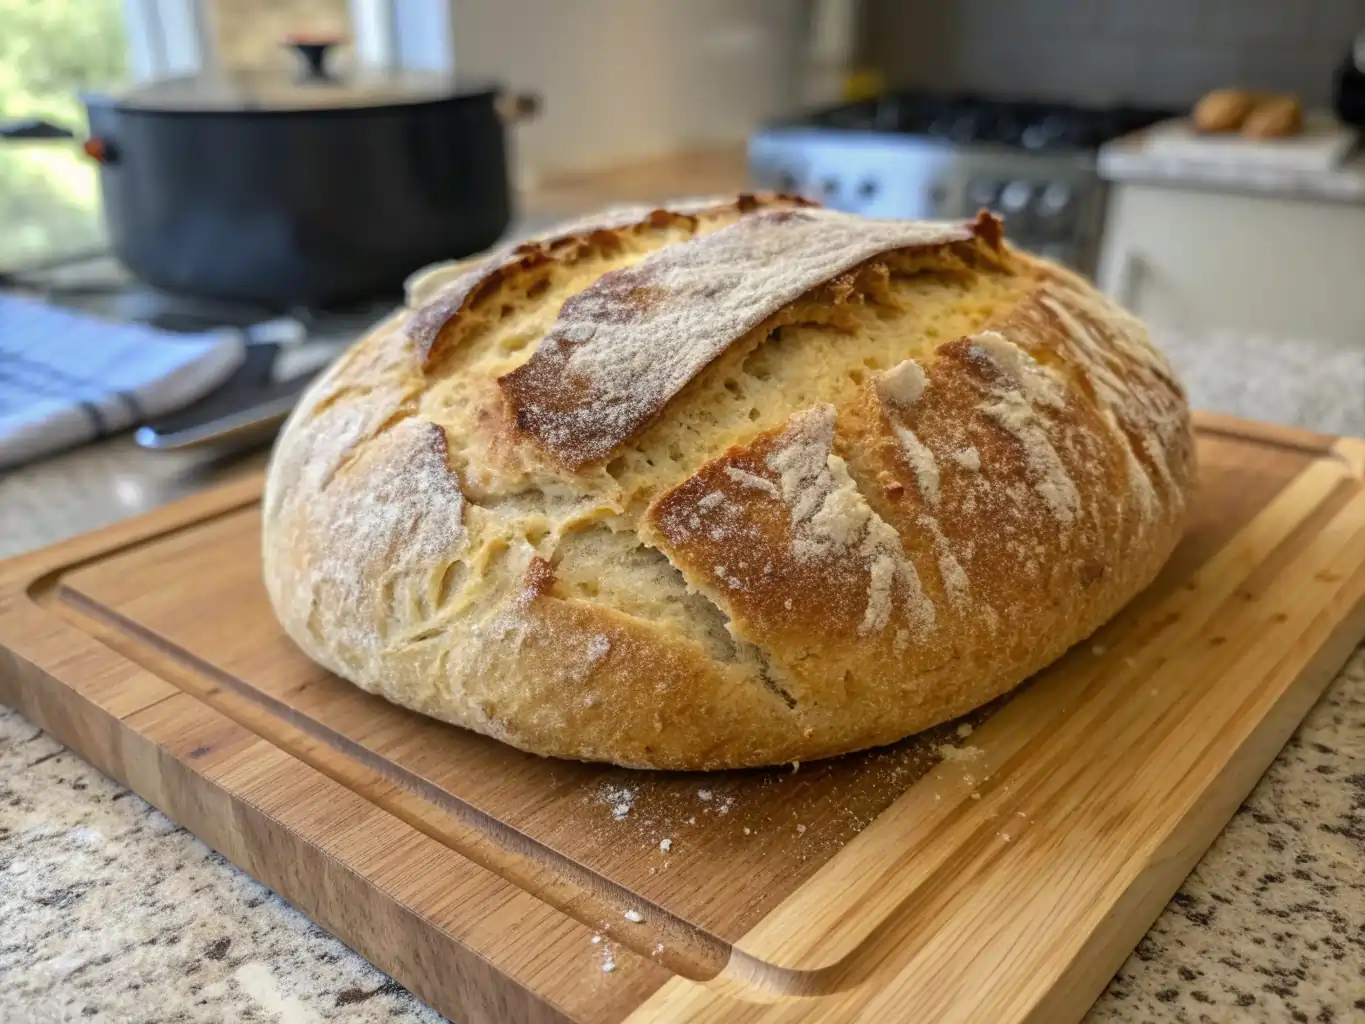
Bake covered for 20 minutes, then uncover and bake for 25 more minutes until the crust is deep golden brown.
Step 5: Cool and Enjoy
Let the bread cool on a rack for at least 2 hours before slicing (hardest part!). If you slice the bread too soon, the crumb may lose its proper form.
You’ve just completed your first sourdough bread recipe—with no fancy tricks, just pure baking bliss.
Sourdough Bread Recipe Tips for Success
What Is the Secret to Making Good Sourdough Bread Recipe?
The difference between a decent homemade loaf and one that truly impresses often comes down to a few key details. If your bread has been falling flat—or lacking the crusty finish and chewy interior—these pro techniques will change everything.
Use an Active Starter
A bubbly, well-fed starter is essential. It should double in size within a few hours of feeding, smell mildly sour (like yogurt or beer), and be able to pass the float test. Inactive cultures result in sluggish fermentation and dense results.
Watch the Temperature
Wild yeast thrives in consistency. Keep the dough in a space that stays between 70°F and 78°F. During winter, try leaving it in the oven with the light on or near a warm appliance.
Choose the Right Hydration
Many artisan loaves use higher hydration, but for beginners, 75% strikes the perfect balance between an airy interior and manageable handling. More water means more open structure—but stick to a hydration level that suits your skill level.
Stretch and Fold Beats Kneading
Rather than kneading aggressively, gently stretch and fold the dough during the early hours of bulk fermentation. Do this about four times, spaced 30 minutes apart. It strengthens the dough without overworking it.
Score for Structure and Style
Scoring isn’t just decorative—it lets steam escape and directs oven spring. Use a sharp blade to slash at an angle just before baking. This helps achieve the beautiful “ear” and signature rise.
Bake with Steam
Using a Dutch oven traps moisture in the first phase of baking, allowing the loaf to fully expand before the crust sets. After the first 20 minutes, remove the lid to develop that deep brown finish.
How to Achieve the Perfect Crust and Crumb
Here’s a quick breakdown of how to nail the two most sought-after traits in rustic bread:
| Feature | Technique |
|---|---|
| Crispy crust | Bake uncovered in the final half. Preheat thoroughly. |
| Open crumb | Use a well-developed starter and avoid overmixing. |
| Rich, tangy flavor | Let dough cold ferment in the fridge overnight. |
| Good rise | Score the dough and bake in a sealed pot at high heat. |
Finally, resist the urge to slice it right away. Letting the bread cool for at least two hours helps set the crumb and enhances the flavor. Cutting too early releases steam and creates a gummy texture.
Common Sourdough Mistakes to Avoid
What Is the Biggest Mistake Beginners Make With Sourdough Bread?
One of the most frequent missteps in making homemade sourdough is using a starter that isn’t fully active. If your culture isn’t rising predictably, producing bubbles, and passing the float test, your bread won’t rise as it should and may end up dense or flat.
But an underperforming starter isn’t the only issue new bakers face. Let’s look at several common problems—and how to fix them before they ruin your next loaf.
Mistake #1: Baking With a Weak Starter
A sluggish starter often leads to poor fermentation. If your dough fails to rise, it’s time to strengthen your starter with two-a-day feedings, unbleached flour, and filtered water for a few days. Keep it at room temperature and monitor how quickly it grows.
Mistake #2: Overproofing the Dough
Too much proofing time can weaken the dough’s internal structure. The signs include excessive stickiness, flattening, and weak oven spring. Watch for the dough’s stretchiness and use the poke test as your guide to readiness.
Mistake #3: Skipping Stretch and Folds
A no-knead wild yeast loaf still needs gluten development. If you don’t gently stretch and fold your dough during bulk fermentation, it won’t have the strength to hold shape or rise well in the oven.
Mistake #4: Slicing the Bread Too Early
Slicing a loaf while it’s still warm lets moisture escape before the crumb settles, often leaving it gummy. Let the bread rest on a wire rack for a minimum of two hours before cutting into it. It’s worth the wait.
Troubleshooting Flat, Dense, or Gummy Loaves
Use this quick table to identify and solve common baking problems:
| Problem | Likely Cause | How to Fix |
|---|---|---|
| Flat loaf | Weak starter, overproofed dough | Feed starter consistently; reduce proofing time |
| Dense crumb | Underfermented dough | Extend bulk fermentation by 1–2 hours |
| Gummy interior | Cut too early, underbaked | Bake longer; allow cooling before slicing |
| Pale crust | Oven not hot enough | Preheat Dutch oven thoroughly |
| No oven spring | Poor shaping or weak gluten | Fold properly and use an active starter |
Baking with wild yeast takes patience and repetition. With each loaf, you’ll get better at reading your dough and understanding what it needs. Soon, you’ll rely more on sight, feel, and timing—rather than just instructions.
Sourdough Bread Baking Schedule
Easy-to-Follow 2-Day Timeline for Baking at Home
One of the biggest myths about the sourdough bread recipe is that making it always takes too much time. While the process does span multiple hours, most of that time is hands-off. With a little planning, baking sourdough can fit into your everyday routine—even during the workweek.
Here’s a beginner-friendly 2-day schedule to help you stay on track:
Day 1 (Evening) – Mixing and Bulk Fermentation
| Time | Task |
|---|---|
| 6:00 PM | Feed your starter to activate (if it’s been in the fridge) |
| 9:00 PM | Mix dough ingredients, rest for 30 minutes |
| 9:30 PM | Add salt, perform 1st stretch and fold |
| 10:00 PM | Perform 2nd fold |
| 10:30 PM | Perform 3rd fold |
| 11:00 PM | Shape dough, place in a floured basket or bowl |
| 11:15 PM | Cover and refrigerate overnight |
Day 2 (Morning) – Bake and Cool
| Time | Task |
|---|---|
| 7:00 AM | Preheat oven and Dutch oven to 475°F |
| 7:45 AM | Score dough and bake |
| 8:30 AM | Remove from oven and cool on a wire rack |
| 10:30 AM | Slice and enjoy |
Adjusting the Timeline for Busy Schedules
Need more flexibility? Here’s how to adapt the process:
Option A: Shorten the Bulk Ferment
If your kitchen is warm (above 75°F), reduce bulk fermentation time to 3 hours instead of 5. Use visual cues: dough should be puffed and slightly jiggly.
Option B: Extend Cold Proofing
Prefer baking later in the day rather than first thing in the morning? Let the shaped dough stay in the fridge up to 24 hours. This deepens flavor without overproofing.
Option C: Weekend Bake
If you’re off on Saturday or Sunday, start the process mid-morning and bake in the evening. It’s ideal for relaxed pacing.
The key to mastering any sourdough bread recipe is timing. Once you understand how dough behaves in your environment, you can adjust the schedule to fit your life—without compromising quality.
Beyond Basic Bread – Creative Sourdough Recipes
Delicious Ideas Using Leftover Starter
Once you’ve mastered the basic sourdough bread recipe, don’t stop there. Your starter is incredibly versatile, and any discard can be transformed into delicious baked goods. Instead of throwing away extra culture, try these easy options:
- Sourdough Pancakes – Fluffy, tangy, and quick to make on a weekend morning.
- Crackers – Mix discard with olive oil, salt, and herbs for a crunchy snack.
- Pizza Crust – Stretch your dough thin, bake hot, and top with fresh ingredients.
- Biscuits – Soft and flaky with a subtle tang, perfect with butter and jam.
Creative Loaves to Try Next
Sourdough isn’t limited to a simple boule, it can be molded and infused with endless variations.These variations build on the same fermentation principles but allow for personal flair:
- Sourdough Focaccia – Thick, olive oil–rich bread, dimpled and topped with herbs or veggies.
- Whole Wheat or Multigrain Loaf – Nutty flavor, more fiber, and a heartier crumb.
- Sourdough Donuts – Sweet, airy, and fried to golden perfection.
- Cinnamon Raisin Bread – Swirled with spices and fruit for breakfast or dessert.
Why Experimenting Matters
Baking sourdough is about more than just a recipe—it’s about creativity. After mastering the basic process, you can play with hydration levels, flour combinations, and proofing times to craft loaves that match your personal style.
Experimenting with add-ins like olives, cheese, seeds, or dried fruit will expand your baking skills while keeping the process fun and rewarding. It’s a way to turn a basic routine into a craft.
Conclusion: Mastering the Sourdough Bread Recipe at Home
Baking sourdough isn’t just about making bread—it’s about building a rhythm, learning patience, and enjoying food made with care. With this step-by-step sourdough bread recipe, you now have the tools to create a loaf that rivals any bakery. From nurturing your starter to mastering fermentation, shaping, and scoring, each step builds confidence and brings you closer to consistent, delicious results.
Remember, every baker learns through trial and error. Don’t be discouraged by a dense loaf or a flat rise in the beginning. Each bake teaches you something new about your dough, your environment, and your process. The more you practice, the more intuitive sourdough becomes.
Whether you stick with the classic round boule or experiment with focaccia, bagels, or even donuts, the world of sourdough is as versatile as it is rewarding. Keep your starter healthy, respect fermentation, and soon baking will feel second nature.
Your sourdough bread recipe journey doesn’t end here—it only gets better with every loaf. Flour, water, and time can create something extraordinary. All it takes is practice.
For more recipes, follow me on Facebook and Pinterest.
FAQs
What is the secret to making good sourdough bread?
The real secret to a successful sourdough bread recipe is consistency. A strong, active starter that doubles within a few hours of feeding is essential. From there, proper fermentation time, good gluten development through stretch-and-folds, and baking in a hot, preheated Dutch oven all contribute to achieving a loaf with great oven spring, a crisp crust, and a soft, open crumb.
Is sourdough actually healthier than regular bread?
Yes, many nutrition experts agree that sourdough offers health benefits that standard yeast-leavened bread does not. During fermentation, the natural bacteria and wild yeast partially break down gluten and phytic acid. This process may make nutrients more available, lower the glycemic index, and improve digestion. A homemade sourdough bread recipe also avoids the preservatives and additives often found in store-bought loaves.
What is the biggest mistake beginners make with sourdough bread?
The number one mistake is baking with an immature starter. Without a vigorous culture, your dough won’t rise properly, leaving you with a dense, flat loaf. Other common errors include overproofing the dough, skipping the stretch-and-fold process, and cutting into the bread too soon after baking. Patience is key to success in any artisan sourdough bread recipe.
How much sourdough starter is needed for a loaf of bread?
Most recipes use about 20% starter relative to flour weight. For example, in a loaf made with 500g of flour, 100g of starter is a standard ratio. This gives the dough enough strength for proper fermentation while keeping the flavor balanced. Adjusting starter amounts can influence rise time, so always pair this with proper fermentation monitoring.
Share Your Experience
There are no reviews yet. Be the first one to write one.