
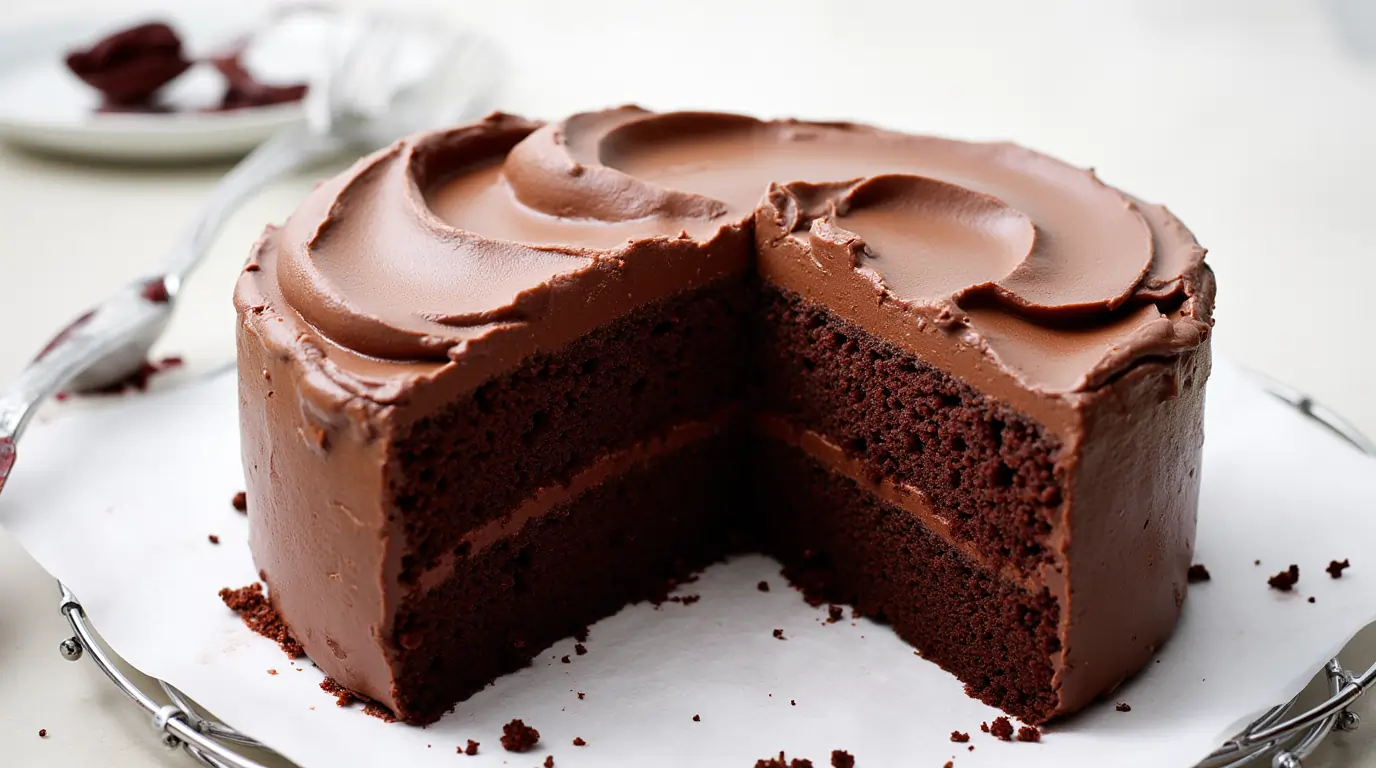
Chocolate lovers rejoice! The Matilda chocolate cake is a dessert that epitomizes indulgence, offering a rich and fudgy experience like no other. This cake isn’t just another chocolate dessert—it’s a showstopper inspired by the iconic scene in the movie Matilda, where Bruce Bogtrotter devours an impossibly rich and gooey chocolate cake. That scene made chocolate cake lovers everywhere dream of recreating the ultimate treat, and this recipe brings that dream to life.
This cake stands out because it strikes the perfect balance between deep chocolate flavor, a moist crumb, and a decadent, melt-in-your-mouth texture. Whether you’re a baking novice or a seasoned pro, this guide will walk you through everything you need to know to bake the perfect Matilda chocolate cake in your own kitchen.
Imagine the joy of serving this cake to your family or guests—watching their eyes light up as they take that first bite of chocolaty perfection. Whether you’re preparing it for a birthday celebration, a dinner party, or simply a self-indulgent treat, this cake is bound to impress.
By following this step-by-step guide, you’ll not only learn the recipe but also master techniques to make your cake irresistibly moist, fudgy, and utterly delicious. Get ready to bake a dessert that’s sure to be a hit with kids and adults alike!
Table of Contents
What Makes Matilda Chocolate Cake So Special?
The Matilda chocolate cake is more than just a dessert—it’s a chocolate lover’s dream come true. This cake has captured the hearts of countless people not only for its incredible taste but also for the nostalgia and whimsy it evokes. Let’s dive into why this chocolate cake is so beloved and what sets it apart from ordinary recipes.
A Chocolate Lover’s Dream
This cake is the ultimate treat for anyone who adores chocolate. With its rich, fudgy texture and intense chocolate flavor, every bite is an indulgent experience. The combination of high-quality cocoa powder and melted chocolate creates a deep, luxurious taste that’s perfect for satisfying even the strongest chocolate cravings. Unlike other cakes that might lean on sweetness alone, the Matilda chocolate cake balances its sweetness with the bold, slightly bitter notes of real chocolate, giving it a gourmet edge.
Nostalgia and Inspiration
The Matilda chocolate cake owes its fame to the iconic movie Matilda, based on Roald Dahl’s beloved novel. In the unforgettable scene, Bruce Bogtrotter is challenged to finish an enormous, gooey chocolate cake, and his victory has become a symbol of determination and indulgence. Baking this cake is like stepping into that scene, bringing a bit of magic and whimsy into your kitchen. It’s not just a dessert—it’s a tribute to a story that has charmed audiences for decades.
Perfect for Every Occasion
Whether you’re baking for a child’s birthday party, a family get-together, or a dinner party with friends, the Matilda chocolate cake is the perfect centerpiece. Its visual appeal, with glossy frosting or ganache draped over the top, makes it as beautiful as it is delicious. Plus, its versatile flavor profile pairs well with countless accompaniments like whipped cream, berries, or even a scoop of vanilla ice cream.
This cake isn’t just food—it’s an experience. It brings people together, sparks conversations, and satisfies the deepest chocolate cravings. That’s what makes the Matilda chocolate cake so special—it’s more than a recipe; it’s a cherished memory waiting to be made in your kitchen.
Ingredients You’ll Need for the Perfect Matilda Chocolate Cake
The secret to a truly decadent Matilda chocolate cake lies in the quality and combination of its ingredients. Each component plays a vital role in achieving the rich, fudgy, and moist texture that makes this cake unforgettable. Below is a detailed breakdown of the ingredients you’ll need, along with tips to make your cake stand out.

Key Ingredients for the Cake Base
To create the perfect foundation for your Matilda chocolate cake, you’ll need the following:
- All-Purpose Flour (1 ¾ cups)
- Forms the structure of the cake while keeping it tender and light.
- Unsweetened Cocoa Powder (¾ cup)
- For a strong chocolate taste, use premium cocoa powder. Dutch-processed cocoa can enhance the richness further.
- Granulated Sugar (2 cups)
- gives the cake a luscious texture and adds sweetness.
- Baking Powder (1 ½ teaspoons) and Baking Soda (1 ½ teaspoons)
- These leavening agents ensure the cake rises beautifully and stays fluffy.
- Salt (1 teaspoon)
- Enhances the overall flavor by balancing the sweetness and chocolate intensity.
For the Fudgy Texture
- Unsalted Butter (½ cup, melted)
- Adds richness and creates a smooth, tender crumb. Use unsalted butter to control the salt level in your recipe.
- Vegetable Oil (¼ cup)
- Keeps the cake extra moist and soft, even days after baking.
- Eggs (2 large)
- Give the cake batter structure, moisture, and richness. Ensure they’re at room temperature for better mixing.
- Whole Milk (1 cup)
- Adds moisture and contributes to the cake’s softness. You can substitute with buttermilk for a slightly tangier flavor.
- Boiling Water (1 cup)
- Enhances the chocolate flavor by blooming the cocoa powder and creates a silky batter.
Optional Add-ons for Extra Flavor
- Espresso Powder (1 teaspoon)
- enhances the flavor of chocolate without introducing coffee.
- Chocolate Chips (½ cup)
- Stir into the batter for extra bursts of melted chocolate in every bite.
Frosting Ingredients
- Unsalted Butter (1 cup)
- Forms the creamy base of your frosting.
- Powdered Sugar (3-4 cups)
- Sweetens and thickens the frosting while maintaining a smooth texture.
- Unsweetened Cocoa Powder (½ cup)
- Gives the frosting its deep chocolate flavor.
- Heavy Cream (¼ cup)
- It helps achieve a silky, spreadable consistency.
- Vanilla Extract (1 teaspoon)
- It balances the chocolate flavor and adds a hint of warmth.
Tips for Ingredient Selection
- Chocolate: Use premium chocolate brands for the melted chocolate or ganache to elevate the flavor.
- Cocoa Powder: If you prefer a more intense flavor, go for Dutch-processed cocoa powder, which is less acidic and has a richer taste.
- Butter vs. Oil: A combination of butter and oil ensures the cake is both flavorful and incredibly moist.
Having the right ingredients on hand is the first step toward creating the perfect Matilda chocolate cake. Gather these essentials, and you’re well on your way to baking a dessert that’s every bit as magical as it is delicious!
Step-by-Step Guide to Making the Cake
Creating the perfect Matilda chocolate cake is as enjoyable as savoring it. This step-by-step guide will ensure your cake turns out rich, moist, and delicious every time. Follow these detailed instructions to master the process.
1. Prepare Your Ingredients and Equipment
- Gather Your Ingredients: Before you begin, measure out all the ingredients listed in the recipe. Accurate measurements are key to a successful cake.
- Preheat the Oven: Set your oven to 350°F (175°C) to ensure it’s fully heated when the batter is ready.
- Grease the Cake Pans: Use two 9-inch round cake pans. Grease them with butter or non-stick spray, then line the bottoms with parchment paper to prevent sticking.
- Mixing Bowls: Prepare two mixing bowls—one for dry ingredients and one for wet ingredients.
2. Mixing the Batter
- Combine Dry Ingredients: In a large mixing bowl, sift together the all-purpose flour, cocoa powder, sugar, baking powder, baking soda, and salt. Sifting helps avoid lumps and ensures even distribution.
- Blend Wet Ingredients: In a separate bowl, whisk together the eggs, melted butter, vegetable oil, vanilla extract, and milk until smooth and uniform.
- Combine Wet and Dry Ingredients: Gradually add the wet ingredients to the bowl of dry ingredients. Stir gently until just combined. Avoid overmixing as this may result in a thick cake.
- Add Boiling Water: Slowly pour in the boiling water, mixing gently. The batter will appear thin, but this is normal—it ensures a moist and fudgy texture.
3. Baking the Cake
- Pour the Batter: Evenly distribute the batter among the two cake pans that have been prepared. To ensure equal baking, smooth the surface with a spatula.
- Bake: After preheating the oven, put the pans in and bake for thirty to thirty-five minutes. A toothpick inserted into the center of the cakes should come out with a few moist crumbs rather than wet batter, indicating that the cakes are done.
- Cool the Cakes: After taking the pans out of the oven, give the cakes ten minutes or so to cool in the pans. Before icing, move them to a wire rack to cool fully.
4. Preparing the Frosting
- Cream the Butter: Using a stand or hand mixer, beat the unsalted butter until light and fluffy.
- Add Dry Ingredients: Gradually add the powdered sugar and cocoa powder, mixing on low speed to avoid a mess.
- Incorporate Liquid Ingredients: Slowly add heavy cream and vanilla extract, mixing until the frosting reaches a smooth, spreadable consistency. Adjust with more cream or powdered sugar as needed.
5. Assembling the Cake
- Level the Cakes (Optional): To achieve an equal surface, trim any cakes with domed tops using a serrated knife.
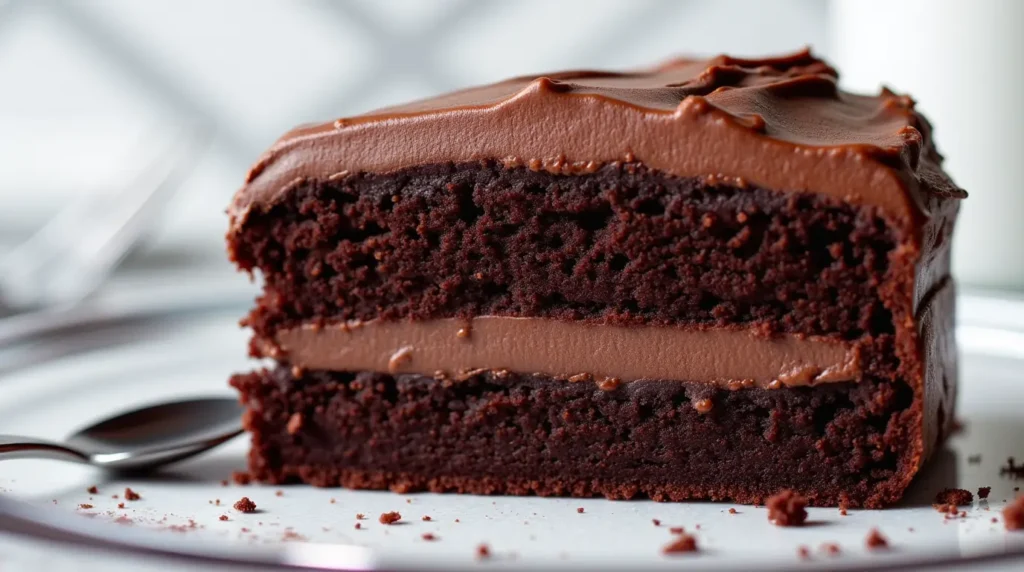
- Layer and Frost: Place one layer of cake on a serving dish or cake stand. Cover the top with a thick coating of frosting. Add the second layer and frost the top and sides, smoothing it with an offset spatula.
- Decorate: Get creative with decorations! Add chocolate shavings, sprinkles, or a drizzle of ganache for an elegant finish.
6. Serving and Enjoying
- Let the cake sit for 30 minutes at room temperature to allow the frosting to set. Slice and serve with whipped cream or a scoop of vanilla ice cream for the ultimate dessert experience.
Tips for Achieving the Perfect Chocolate Cake
The secret to an exceptional Matilda chocolate cake lies in the small details. While the recipe itself provides a strong foundation, these expert tips will elevate your cake from delicious to truly unforgettable. Follow these suggestions to ensure your chocolate cake turns out moist, flavorful, and irresistible every time.
1. Use Quality Ingredients
- Cocoa Powder: Invest in high-quality unsweetened cocoa powder. Dutch-processed cocoa is an excellent choice for a richer, more intense flavor.
- Chocolate: If you’re adding melted chocolate or chocolate chips, choose premium brands with high cocoa content for superior taste.
- Butter and Dairy: Use unsalted butter and full-fat dairy products like whole milk or heavy cream. These ingredients contribute to the cake’s richness and texture.
2. Measure Ingredients Accurately
- Weigh Your Ingredients: For precise results, use a kitchen scale to measure flour, cocoa powder, and sugar. Even slight deviations can affect the cake’s texture.
- Avoid Overpacking Flour: If measuring by volume, spoon the flour into the measuring cup and level it off with a knife to avoid packing too much flour, which can lead to a dense cake.
3. Don’t Overmix the Batter
- Why It Matters: Overmixing activates the gluten in the flour, which can make the cake tough and dense.
- How to Avoid It: Mix the batter until the ingredients are just combined. A few lumps are fine—they’ll dissolve during baking.
4. Preheat Your Oven and Bake at the Right Temperature
- Preheat Thoroughly: Always preheat your oven for at least 10–15 minutes before baking to ensure an even temperature.
- Check with an Oven Thermometer: Oven temperatures can vary, so use a thermometer to confirm accuracy.
- Avoid Overbaking: A few minutes before to the suggested baking time, check the cake to prevent overbaking. Overbaking can dry out the cake, so look for a toothpick to come out with a few moist crumbs, not dry or wet batter.
5. Use Boiling Water for Enhanced Flavor and Texture
- Why It Works: Boiling water blooms the cocoa powder, intensifying its chocolate flavor. It also makes the batter thinner, which leads to a more tender, moist cake.
- Pro Tip: You can replace boiling water with hot coffee for an even deeper chocolate flavor. The coffee enhances the cocoa without making the cake taste like coffee.
6. Cool the Cake Properly
- Allow to Rest in Pans: Let the cake cool in the pans for about 10 minutes after baking to firm up slightly.
- Cool Completely: Transfer to a wire rack to cool fully before frosting. When you frost a warm cake, the icing may melt and come off.
7. Customize the Frosting and Decorations
- Choose the Right Frosting: For a classic Matilda chocolate cake, a rich chocolate buttercream or ganache works best.
- Decorate Creatively: Add chocolate shavings, drizzle ganache, or top with berries for a professional touch.
- Optional Layers: Add a layer of raspberry jam or caramel sauce between the cake layers for added flavor complexity.
8. Store and Serve with Care
- Storage Tips: Keep the cake in an airtight container to prevent it from drying out. You may keep it in the fridge for up to a week or at room temperature for up to two days.
- Reheating Leftovers: Warm slices slightly in the microwave for 10–15 seconds to revive the gooey texture.
Mastering these tips will ensure that your Matilda chocolate cake is always a crowd-pleaser. Baking is as much an art as it is a science, and with these strategies, you’ll consistently achieve the rich, moist perfection that makes this cake truly iconic.
Serving and Storing Your Matilda Chocolate Cake
Once you’ve baked and frosted your Matilda chocolate cake to perfection, the final steps—serving and storing—are just as important to ensure the cake remains as delicious as it was freshly made. Here’s how to serve your cake like a pro and keep it fresh for later indulgence.
Serving Your Matilda Chocolate Cake
- Allow the Cake to Set
- After frosting, let the cake sit at room temperature for at least 30 minutes to allow the frosting to firm up slightly. This makes slicing easier and prevents the frosting from smudging.
- Prepare the Perfect Slice
- Use a long, sharp knife for clean cuts. For best results, dip the knife in hot water and wipe it dry before slicing—this prevents the cake from sticking to the knife.
- Slice portions based on your audience: smaller slices for kids or casual gatherings and larger slices for chocolate enthusiasts who want the full experience.
- Pairing Suggestions
- Serve each slice with a dollop of whipped cream, a scoop of vanilla ice cream, or a drizzle of chocolate or caramel sauce for added decadence.
- Fresh berries like raspberries or strawberries can balance the richness with a hint of tartness, creating a delightful contrast.
- For a gourmet touch, sprinkle powdered sugar or cocoa powder over the plated slice before serving.
- Temperature Tips
- The cake can be served at room temperature for a soft, moist texture.
- If refrigerated, let the cake sit out for 20–30 minutes before serving to bring it back to its ideal texture and flavor.
Storing Your Matilda Chocolate Cake
- Short-Term Storage
- Room Temperature: If you plan to finish the cake within 2 days, cover it with a cake dome or store it in an airtight container at room temperature. Make sure the storage space is cold and out of the direct sun.
- Pro Tip: To prevent the cut edges of the cake from drying out, press a piece of plastic wrap directly against the exposed surface.
- Refrigeration
- How to Store: Place the cake in an airtight container or tightly wrap it in plastic wrap to keep it fresh. Refrigerated cake can last up to 5–7 days.
- Serving from the Fridge: For the best texture and flavor, let refrigerated slices come to room temperature for about 30 minutes before serving.
- Freezing for Long-Term Storage
- Before Freezing: If you plan to freeze the cake, wrap each unfrosted layer in plastic wrap and place it in a freezer-safe bag. Frosted cakes can also be frozen, but freeze the cake uncovered first for 1–2 hours to set the frosting, then wrap it tightly in plastic wrap and foil.
- Freezer Shelf Life: The cake can be frozen for up to 3 months.
- Thawing: To thaw, transfer the cake to the refrigerator overnight, then bring it to room temperature before serving.
Repurposing Leftovers
- Chocolate Trifles: Layer leftover cake pieces with whipped cream, chocolate pudding, or fruit in a glass for a quick and easy dessert.
- Cake Pops: Crumble the remaining cake, combine it with the icing, and then form it into balls. Dip them in melted chocolate for a fun treat.
- Ice Cream Sundae Topping: Crumble the cake over a bowl of ice cream for an indulgent twist.
Proper serving and storage ensure your Matilda chocolate cake remains just as delectable days later as it was on the first bite. With these tips, you can enjoy this iconic dessert to the fullest, whether it’s fresh from the oven or a frozen delight for a future treat.
Conclusion
Baking the perfect Matilda chocolate cake is more than just following a recipe—it’s about creating a rich, indulgent experience that brings joy to anyone who tastes it. From the deep, fudgy flavor to the smooth, creamy frosting, every element of this cake is designed to impress and satisfy even the most discerning chocolate lovers. Whether you’re baking for a special occasion or simply treating yourself, this cake is sure to be a hit.
Why You’ll Love This Cake
The Matilda chocolate cake stands out because of its versatility. It’s the ideal dessert for birthdays, dinner parties, or just an afternoon treat with family and friends. With its perfect balance of sweetness and richness, it appeals to a wide range of tastes and ages, making it a crowd-pleaser every time. Inspired by the beloved Matilda movie, it carries with it a sense of nostalgia and fun, adding a bit of magic to your kitchen and table.
Savoring the Moment
One of the joys of baking is sharing your creation, and the Matilda chocolate cake offers ample opportunity for moments of connection. Whether you’re cutting slices at a celebration or enjoying a quiet piece with a cup of coffee, this cake is a reminder that food is not just about eating—it’s about experience. It’s a perfect treat to enjoy with loved ones, savoring the deep chocolate flavor, and celebrating life’s sweetest moments.
A Cake for All Occasions
This cake isn’t just a one-time dessert; it’s a cake that can become a part of your regular baking repertoire. Whether you’re making it for a holiday, a birthday, or just because, it’s adaptable to many different occasions. You can even customize the frosting and decorations based on the season or theme, making it a truly versatile dessert that’s always a showstopper.
Final Thoughts
Now that you’ve mastered the steps to creating the perfect Matilda chocolate cake, you can confidently bake and share this delectable treat with those around you. With its rich, moist layers and luxurious frosting, it’s sure to become a favorite in your baking collection. So, grab your ingredients, preheat that oven, and start baking a cake that’s not only delicious but also filled with memories and a touch of whimsy!
Whether you’re serving it for a special celebration or just as a treat for yourself, this Matilda chocolate cake will always be a memorable and delightful dessert that brings joy to any occasion.
FAQ
Can I make Matilda chocolate cake in advance?
It is possible to prepare the cake in advance. The baked cake layers can be wrapped tightly in plastic wrap and stored at room temperature for 1–2 days or in the refrigerator for up to a week. If you prefer, you can freeze the cake layers for up to 3 months. Once you’re ready to serve, frost the cake once it has cooled completely
How can I tell whether the cake is done baking?
Put a toothpick in the middle of the cake to see whether it’s done. If it comes out with a few moist crumbs (but not wet batter), your cake is done. If the toothpick is clean, it may be slightly overcooked, so be sure to check a few minutes before the recommended baking time ends.
Can I use a different type of cocoa powder?
You may use Dutch-processed cocoa powder or natural unsweetened cocoa powder for this recipe. Dutch-processed cocoa has a smoother, less acidic flavor, which gives the cake a richer taste. However, if you use natural cocoa powder, you may need to adjust the acidity slightly by adding a pinch of baking soda to balance the flavor.
What can I substitute for vegetable oil in the cake recipe?
If you don’t have vegetable oil, you can substitute it with other oils like canola, sunflower, or even melted coconut oil. Alternatively, you can use sour cream or yogurt for added moisture and richness, although this may slightly alter the cake’s texture.
How can I make this cake gluten-free?
To make this cake gluten-free, replace the all-purpose flour with a 1:1 gluten-free flour blend that includes xanthan gum for structure. Be sure to use a gluten-free baking powder, and double-check that the cocoa powder and other ingredients are certified gluten-free.
Share Your Experience
There are no reviews yet. Be the first one to write one.