
Unicorn cakes have taken the world by storm, becoming a staple centerpiece at birthdays, baby showers, and whimsical celebrations. Their magical design, featuring vibrant colors, glittering accents, and the iconic unicorn horn, brings a touch of enchantment to any event. The combination of delightful aesthetics and delicious flavors makes them crowd-pleasers for kids and adults alike.
In this guide, you’ll learn how to create your unicorn cake that looks stunning and tastes incredible. Whether you’re a seasoned baker or a beginner looking to try something new, this step-by-step tutorial will break down the process into simple, manageable steps.
By the end of this blog post, you’ll have all the tools, techniques, and creative inspiration needed to bake and decorate a perfect unicorn cake. Let’s dive into the magical world of baking and make your unicorn cake dreams come true!
Table of Contents
Tools and Ingredients You’ll Need
Before you dive into baking your magical unicorn cake, it’s essential to have the right tools and ingredients at hand. Being well-prepared will ensure that the process is smooth, enjoyable, and stress-free. Below is a detailed list of everything you need to make the perfect unicorn cake.

Baking Essentials
Having the right baking tools is crucial for achieving professional-looking results. Here’s what you’ll need:
- Cake Pans
- Choose two or three round cake pans (6 or 8 inches) for creating beautiful layered cakes. Opt for non-stick pans to prevent sticking and ensure even baking.
- Mixing Bowls and Measuring Tools
- Use sturdy mixing bowls in various sizes for preparing the batter and frosting. Don’t forget measuring cups and spoons for precise measurements—baking is all about accuracy!
- Spatulas and Cake Scraper
- A silicone spatula is perfect for folding batter and spreading frosting evenly. A cake scraper helps create smooth sides for a flawless finish.
- Piping Bags and Decorating Tips
- Invest in a set of piping bags and tips to create intricate decorations, swirls, and rosettes on your cake. A star tip and round tip are particularly versatile for unicorn designs.
- Turntable (Optional but Recommended)
- A rotating cake turntable makes decorating easier and ensures smooth application of frosting and decorations.
Key Ingredients
The right ingredients are the foundation of a delicious and visually stunning unicorn cake. Here’s what you’ll need:
- Cake Mix or Homemade Batter
- Use a vanilla, confetti, or chocolate cake mix, or whip up your own from scratch. A moist, fluffy cake will serve as the perfect base.
- Buttercream Frosting
- Prepare a batch of buttercream frosting for layering and decorating. It’s versatile, easy to work with, and can be colored in any shade using food coloring.
- Food Coloring
- Gel food coloring is ideal for vibrant hues without altering the consistency of your batter or frosting. Choose shades like pink, blue, yellow, and purple for a magical touch.
- Edible Glitter and Sprinkles
- Add some sparkle with edible glitter and rainbow sprinkles. These elements enhance the cake’s whimsical vibe.
Decorations for a Magical Look
What sets a unicorn cake apart is its magical decorations. Gather these items for the final touches:
- Unicorn Horn and Ears
- Purchase a premade unicorn horn topper and ears, or make your own using fondant. Gold accents for the horn add an extra sparkle.
- Rainbow Sprinkles and Edible Pearls
- Use sprinkles and pearls to add texture and pops of color to your cake.
- Fondant Accents
- Fondant is perfect for creating details like eyelashes, flowers, or other embellishments.
- Edible Glitter
- Dust your cake with edible glitter for a magical shimmer.
Baking the Cake Layers
The foundation of a perfect unicorn cake is its layers. Baking them correctly ensures your cake is not only delicious but also structurally sound and visually stunning. Here’s a detailed guide to help you achieve perfect cake layers every time.
Preparing the Batter
The first step to creating your unicorn cake is preparing a smooth, evenly mixed batter. Here’s how:
- Choose Your Recipe
- Decide on a vanilla, confetti, or chocolate cake recipe as your base. For a unicorn cake, vanilla or confetti is ideal, as it allows the colorful layers to shine.
- Mixing for Consistency
- To guarantee a soft texture, cream the sugar and butter until light and frothy. Add the eggs one at a time, mixing well each time. Include To prevent overmixing, gently incorporate the liquid and dry components in alternating additions.
- Add Vibrant Colors
- Distribute the mixture evenly into many bowls, depending on how many layers you choose to make. Use gel food coloring to tint each portion a different color, such as pink, blue, purple, or yellow. Gel colors are concentrated, so a small amount goes a long way.
Baking Perfect Layers
Baking your cake layers evenly is crucial for a professional look. Follow these steps:
- Prepare Your Pans
- Grease your cake pans with butter or non-stick spray, then line the bottoms with parchment paper. This ensures easy release and prevents sticking.
- Measure Evenly
- Distribute the batter evenly between the pans using a kitchen scale. This ensures consistent layer thickness, which is key for a balanced cake.
- Set the Right Temperature
- Bake the layers at 325–350°F (160–175°C), depending on your recipe. Lower temperatures help prevent doming and ensure the layers bake flat.
- Monitor Closely
- After baking for about 20 to 25 minutes, insert a toothpick into the center of the cakes to determine if they are done. The cakes are fully baked when a toothpick inserted into the center emerges free of batter. Avoid opening the oven frequently, as this can cause uneven baking.
Storing Cake Layers
Properly storing your layers will make assembling and decorating your unicorn cake much easier. Here’s what to do:
- Cool Completely
- Allow the cakes to cool in their pans for 10–15 minutes, then transfer them to a wire rack to cool completely. Warm cakes can cause frosting to melt, so patience is key.
- Level the Layers
- Use a serrated knife or cake leveler to trim any domed tops, ensuring flat, even layers that stack neatly.
- Wrap and Chill
- Wrap each layer tightly in plastic wrap and refrigerate for at least 1–2 hours. During assembly, chilled layers are less prone to disintegrate and are simpler to handle. You can also freeze the layers for longer storage, up to a month.
Decorating Your Unicorn Cake
Decorating is where your unicorn cake truly comes to life! This is your chance to add color, creativity, and magic to your cake. With some simple techniques and attention to detail, you can create a show-stopping centerpiece for any celebration. Here’s how to transform your baked layers into a magical unicorn cake.
Assembling the Layers
Before diving into decoration, it’s essential to assemble your cake properly to create a stable foundation.
- Stacking the Layers
- Start by placing one cake layer on a cake board or serving plate. Apply a thin layer of buttercream frosting on top as your filling.
- Repeat this process with the remaining layers, ensuring each one is level and aligned. Alternate frosting colors for an extra surprise when the cake is sliced.
- Crumb-Coating the Cake
- To catch crumbs, cover the entire cake with a thin coating of icing. The flawless foundation for the last layer of icing is produced by this “crumb coat.”
- Chill the cake for 15–30 minutes to set the crumb coat before proceeding.
- Final Frosting Layer
- Once the crumb coat is set, apply a thicker layer of buttercream frosting. Use a cake scraper or offset spatula to create smooth sides and a neat finish. Rotate the cake on a turntable for even coverage.
Adding the Buttercream Magic
Buttercream frosting is a key element in making your unicorn cake magical and eye-catching.
- Creating a Colorful Finish
- Divide your frosting into separate bowls and tint each portion with gel food coloring.
- Use a piping bag with a star or round tip to pipe swirls, rosettes, or other designs on the cake’s surface. For a whimsical look, blend colors to create an ombre or rainbow effect.
- Texturing the Frosting
- Use a spatula to create textured patterns like waves or stripes. These add dimension and a professional touch to your cake.
- Finishing Touches
- Dust edible glitter over the frosting for a magical shimmer. You can also sprinkle rainbow-colored nonpareils or edible pearls for added charm.
The Unicorn Touch
Now it’s time to bring your unicorn cake to life with iconic features and magical accents.
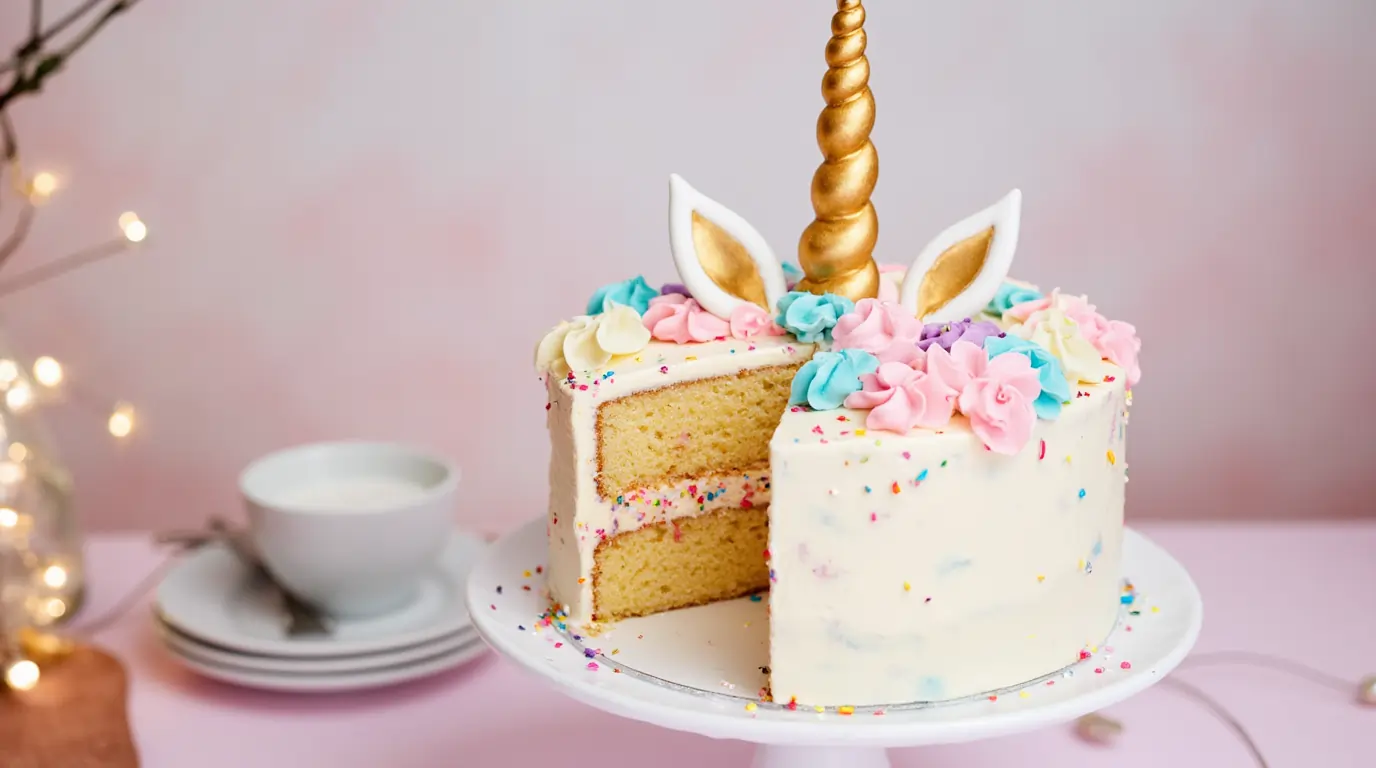
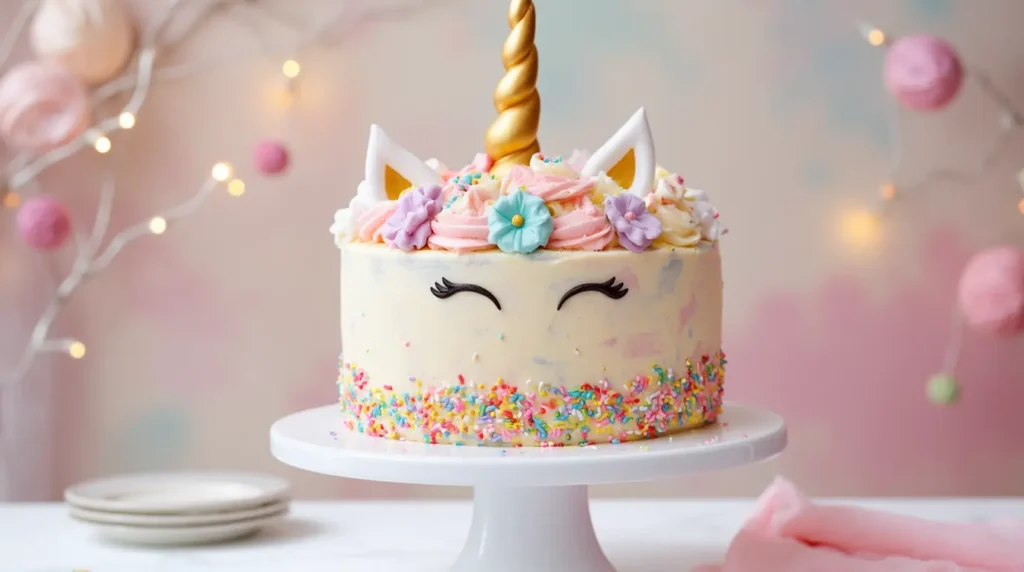
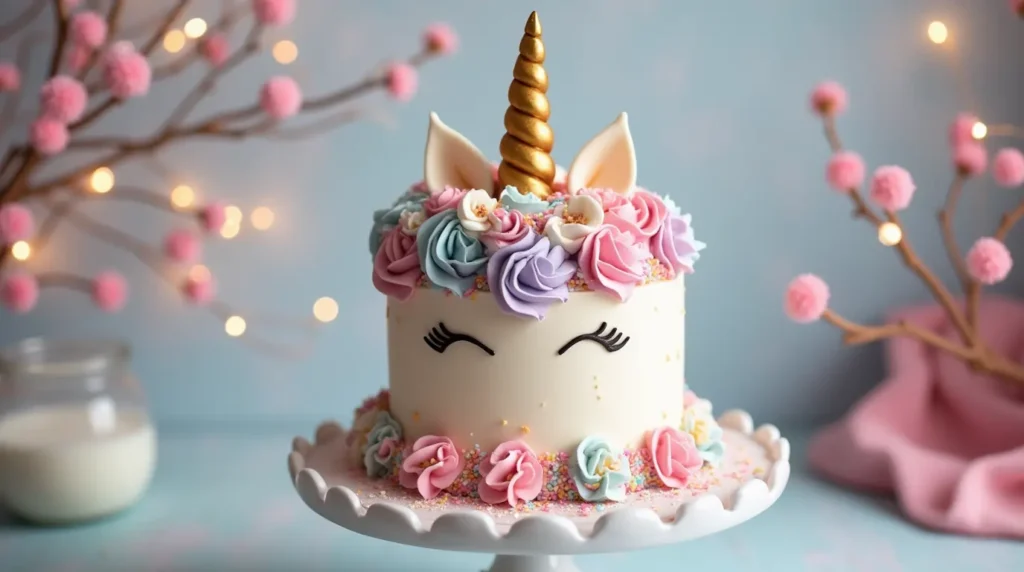
- Attaching the Unicorn Horn and Ears
- Position the premade fondant or plastic unicorn horn topper in the center of the cake. Add the ears on either side of the horn, pressing gently into the frosting to secure them.
- Adding the Face Details
- Use black fondant or edible markers to create eyelashes and eyes. Place these on the side of the cake to give your unicorn a sweet, whimsical expression.
- Decorating with Flowers and Sprinkles
- Add fondant flowers or piped buttercream rosettes around the base of the horn and ears for a floral crown effect. Sprinkle edible glitter, pearls, or confetti for extra sparkle.
Pro Tips for a Stunning Unicorn Cake
- Chill Between Steps
- Refrigerate the cake at various stages to keep the frosting firm and make handling easier.
- Balance Colors
- Choose complementary colors for a cohesive look, whether you prefer a vibrant rainbow or soft pastels.
- Customize Your Design
- Add a personal touch with names, numbers, or unique patterns using fondant or buttercream.
Creative Unicorn Cake Ideas for Inspiration
When it comes to unicorn cakes, the possibilities are endless! Whether you’re planning a whimsical party for kids or a chic celebration for adults, these creative unicorn cake ideas will spark your imagination and help you craft a truly magical dessert. Here are some unique themes and styles to consider for your unicorn cake.
Rainbow-Themed Unicorn Cakes
Nothing says “unicorn” quite like a vibrant rainbow design! This theme is a favorite for its bold, cheerful colors and playful aesthetic.
- Layered Rainbow Cake
- Use brightly colored layers of cake in a rainbow spectrum. When guests cut into the cake, they’ll be delighted by the surprise inside.
- Decorate the exterior with matching rainbow buttercream swirls and sprinkles for a cohesive look.
- Drip Effect with Rainbow Colors
- Create a white or pastel-frosted cake and add a colorful ganache drip in rainbow shades. Top with a fondant unicorn horn and ears for the perfect finishing touch.
- Rainbow Buttercream Swirls
- Use a multi-colored piping bag to create rainbow rosettes or swirls on the cake. This effect is simple yet incredibly eye-catching.
Pastel and Elegant Unicorn Cakes
For a more refined look, pastel unicorn cakes are perfect. These cakes are soft, sophisticated, and ideal for events like baby showers or weddings.
- Soft Ombre Design
- Create a frosting gradient that transitions from light pink to lavender or blue. Pair with delicate fondant flowers and gold accents to elevate the design.
- Minimalist Unicorn Cake
- Focus on simplicity with clean, white frosting and minimal decorations. Use pastel fondant for the horn and ears, and add a few elegant gold touches for a chic look.
- Floral Crown Unicorn Cake
- Decorate the top of the cake with pastel buttercream flowers arranged in a crown around the horn. This style exudes elegance and charm.
Mini Unicorn Cupcakes
Unicorn cupcakes are a great option if you’re looking for individual servings or party favors.
- Mini Horn and Ears
- Each cupcake should have a little fondant horn and ears. Frost with buttercream swirls in various pastel colors.
- Sprinkle edible glitter or nonpareils for a magical touch.
- Personalized Cupcakes
- Write names or initials on each cupcake using edible markers or frosting. Perfect for parties where guests can take their cupcakes home as a favor.
- Variety in Design
- Decorate cupcakes in different themes, such as some with rainbows, others with flowers, and a few with shimmering stars.
Personalized Unicorn Cakes
Add a personal touch to your unicorn cake to make it extra special. Custom designs are perfect for themed parties or individual preferences.
- Name and Age Details
- Incorporate the recipient’s name or age into the cake design. Use fondant letters or edible markers to personalize the cake.
- Themed Unicorn Cakes
- Customize the cake to match a specific party theme, like a galaxy unicorn cake with starry decorations or a tropical unicorn with floral and fruity elements.
- Custom Colors
- Choose colors that reflect the recipient’s preferences, such as bold neons, shimmering metallics, or soft neutrals.
Tips for Making the Perfect Unicorn Cake Every Time
Creating the perfect unicorn cake requires attention to detail, creativity, and a few tried-and-true techniques. These expert tips will help you avoid common pitfalls and ensure that your cake is not only magical in appearance but also delicious and structurally sound.
Time-Saving Hacks
If you’re short on time or baking for a large party, these hacks can streamline the process without compromising on quality:
- Use Pre-Made Decorations
- Purchase ready-made unicorn horns, ears, and edible decorations like fondant flowers or edible glitter. This saves time on sculpting and crafting your own.
- Opt for a Cake Mix
- While homemade batter is great, a high-quality cake mix can be a lifesaver when you’re pressed for time. Add a few personal touches, like extra vanilla or sprinkles, to elevate the flavor.
- Batch Your Tasks
- Bake the cake layers a day in advance and store them in the refrigerator or freezer. Similarly, prepare your frosting ahead of time to reduce stress on decorating day.
Common Mistakes to Avoid
You may avoid a lot of frustration by taking note of other people’s blunders. The following are typical hazards to avoid:
- Uneven Layers
- Always weigh your batter to ensure each cake layer is the same thickness. This prevents a lopsided cake.
- Melting Decorations
- Avoid placing your cake in a warm environment. Buttercream and fondant decorations can melt or slide off, especially in hot weather. Refrigerate the cake until serving time.
- Overmixing Batter
- Overmixing can result in a dense cake instead of a light and fluffy texture. Mix just until the ingredients are combined.
- Skipping the Crumb Coat
- Forgoing a crumb coat can make your final frosting look messy. Always apply a thin layer of frosting first to trap crumbs before adding the main layer.
Pro Tips for a Professional Finish
For a unicorn cake that looks like it came from a bakery, follow these professional tricks:
- Smooth Frosting with a Cake Scraper
- Achieving smooth frosting is key to a polished look. Use a cake scraper while rotating the cake on a turntable to create even, flawless sides.
- Chill Between Steps
- After crumb-coating, refrigerate the cake for at least 15–30 minutes. Similarly, chill the cake again after the final frosting layer to make adding decorations easier.
- Blend Colors Like a Pro
- For an ombre or rainbow effect, apply colored frosting in sections, then use a spatula to blend the colors seamlessly. This creates a magical gradient effect.
- Test Your Piping Skills
- Practice piping rosettes, swirls, and other designs on parchment paper before decorating the actual cake. This ensures your technique is refined.
- Use Edible Glitter for Extra Magic
- A light dusting of edible glitter on the frosting and decorations can add a magical shimmer, taking your cake to the next level.
Bonus Tip: Add a Fun Surprise
Surprise your guests with a fun element inside the cake:
- Pinata Cake Effect
- Hollow out the center of the cake layers and fill it with sprinkles, candies, or edible glitter. When the cake is sliced, the hidden surprise will spill out for a magical moment.
- Rainbow Layers Inside
- Create colorful layers by tinting your batter with different shades of gel food coloring. The rainbow effect will wow your guests when they cut into the cake.
FAQs
Can I make a unicorn cake without fondant?
Absolutely! You can create a unicorn cake using buttercream frosting for decorations. Create rosettes, swirls, or flowers using a piping bag, and use piped frosting shapes or premade edible toppers in place of fondant accents like the horn and ears.
How do I keep the layers of my cake from adhering to the pan?
To avoid sticking, grease your cake pans with butter or non-stick spray, then line the bottoms with parchment paper. This method ensures that your layers release easily without breaking.
What’s the best way to achieve vibrant colors in my cake?
Instead of using liquid food coloring, use gel. Gel colors are more concentrated, allowing you to achieve bright, vibrant shades without altering the batter or frosting consistency.
Is it possible to prepare the unicorn cake in advance?
Yes! You can bake the cake layers up to two days in advance and store them wrapped in plastic wrap in the refrigerator. Frosting and assembly can also be done a day ahead—just store the finished cake in the fridge and let it come to room temperature before serving.
How can I make my unicorn cake more unique?
Personalize your unicorn cake by customizing the colors, adding surprise elements like a candy-filled center, or including themed decorations like galaxy designs, floral patterns, or metallic accents. Let your creativity shine!
Conclusion
Creating a unicorn cake is more than just baking a dessert—it’s about crafting a magical centerpiece that brings joy and wonder to any celebration. With its vibrant colors, whimsical decorations, and delicious flavors, a unicorn cake is the perfect way to add a touch of enchantment to birthdays, baby showers, or themed parties.
By following this step-by-step guide, you’ve learned how to bake perfect layers, decorate with precision, and bring a creative vision to life. From assembling the cake to adding the finishing touches like the iconic unicorn horn and ears, every step is an opportunity to showcase your creativity and passion for baking.
Unicorn cakes are not just for professional bakers—they’re for anyone willing to embrace the fun and magic of the process. Whether it’s your first time making a cake like this or you’re looking to refine your skills, remember that practice and experimentation are key. Don’t be afraid to make the design uniquely yours by incorporating personal touches like custom colors, surprise fillings, or themed decorations.
If you’ve enjoyed creating your unicorn cake, share your masterpiece with friends, family, or even on social media. Celebrate your success and inspire others to try their hand at making their magical desserts.
Share Your Experience
There are no reviews yet. Be the first one to write one.