
A Hello Kitty cake is the perfect choice for a girl’s birthday celebration! Hello Kitty, the iconic Sanrio character, has been a favorite among children and adults alike for decades. With her adorable pink bow and sweet expression, she makes a fantastic cake design that adds charm and fun to any party.
In this guide, you’ll learn how to create the perfect Hello Kitty cake for a girl’s birthday with a step-by-step process that’s both easy and fun. Whether you’re a beginner or an experienced baker, this tutorial will help you bake a delicious and beautifully decorated cake using simple techniques and readily available ingredients.
We’ll cover:
- The essential ingredients and baking tools needed.
- How to bake a fluffy, moist cake for the best results.
- Decorating techniques to achieve the perfect Hello Kitty look.
- Tips on serving, storing, and making ahead for a stress-free birthday celebration.
By the end of this post, you’ll be able to create a stunning Hello Kitty cake that will wow your child, family, and guests. Let’s get started! 🎂✨
Table of Contents
Ingredients You Need for a Hello Kitty Cake
Before you start baking and decorating, it’s important to gather all the necessary ingredients. This ensures a smooth baking process and helps you achieve the perfect Hello Kitty cake for a girl’s birthday. Below, we’ve broken down the essential ingredients into three categories: cake ingredients, decorating essentials, and baking tools.

Essential Cake Ingredients
A moist and flavorful cake is the foundation of any great birthday cake. You can use a classic vanilla sponge cake, but you can also try other flavors like chocolate, strawberry, or red velvet to match the birthday girl’s preference.
Here’s what you’ll need:
- Cake Flour (2 ½ cups) – Provides a light and fluffy texture. All-purpose flour works too.
- Baking Powder (2 ½ teaspoons) – Helps the cake rise beautifully.
- Granulated Sugar (1 ¾ cups) – Adds sweetness and enhances the cake’s texture.
- Unsalted Butter (1 cup, softened) – Gives the cake a rich and buttery taste.
- Eggs (4 large) – Adds structure and moisture.
- Whole Milk (1 cup) – Keeps the cake moist and tender.
- Vanilla Extract (1 ½ teaspoons) – Enhances the cake’s flavor.
- Strawberry or Raspberry Jam (optional, for filling) – Adds a fruity twist between the cake layers.
🔹 Tip: If you prefer a shortcut, you can also use a vanilla or white cake mix to save time!
Decorating Essentials
To achieve the signature Hello Kitty look, you’ll need colored fondant, buttercream, and edible details for decoration.
For the Base Frosting:
- Butter (1 cup, softened) – The base for buttercream frosting.
- Powdered Sugar (4 cups, sifted) – Ensures a smooth, creamy texture.
- Heavy Cream or Milk (2-3 tablespoons) – Adjusts consistency.
- Vanilla Extract (1 teaspoon) – Adds a subtle, delicious flavor.
- Pink Gel Food Coloring – For the signature Hello Kitty bow.
- Black Gel Food Coloring – For whiskers and eyes.
- Yellow Gel Food Coloring – For Hello Kitty’s nose.
For Fondant Details (Alternative to Buttercream Decoration):
- White Fondant – Covers the cake for a smooth finish.
- Pink Fondant – For Hello Kitty’s bow.
- Black Fondant – For whiskers and eyes.
- Yellow Fondant – For her nose.
🔹 Tip: If using buttercream instead of fondant, you can pipe the details using a fine round piping tip.
Tools for Baking and Decorating
Having the right tools makes decorating easier and helps you create a professional-looking cake.
Baking Tools:
- Hello Kitty Cake Pan (or Round Cake Pan + Stencil) – A Hello Kitty-shaped pan is the easiest option, but you can also bake a round cake and carve the shape using a stencil.
- Mixing Bowls & Electric Mixer – For preparing the cake batter and frosting.
- Offset Spatula – Helps spread frosting evenly.
- Cake Leveler or Serrated Knife – For cutting even cake layers.
Decorating Tools:
- Piping Bags & Tips – For detailed frosting work.
- Edible Markers or Piping Gel – To draw fine details like whiskers.
- Small Fondant Cutter or Knife – For shaping Hello Kitty’s bow and face details.
- Cake Turntable (Optional): Facilitates decorating and icing.
🔹 Tip: If you don’t have a Hello Kitty cake pan, print out a Hello Kitty face outline, place it on the cake, and cut around it for a DIY shape!
Step-by-Step Guide to Baking the Cake
Now that you have all the ingredients and tools ready, it’s time to bake your Hello Kitty cake for a girl’s birthday! This section will guide you through each step, from preparing the batter to baking and cooling the cake.

Preparing the Cake Batter
A fluffy, moist cake is the perfect base for decorating. Follow these steps to mix your cake batter properly:
- Turn the oven on to 350°F (175°C) to preheat it. This ensures an even bake.
- Prepare Your Cake Pan – If you’re using a Hello Kitty-shaped cake pan, grease it well with butter or non-stick spray and dust it with flour. If using a round cake pan, grease it and line the bottom with parchment paper.
- Combine the dry ingredients in a big basin by sifting them together:
- 2 ½ cups cake flour
- 2 ½ teaspoons baking powder
- ½ teaspoon salt
- Stir with a whisk to combine.
- Cream Butter and Sugar – In a separate bowl, beat 1 cup softened butter and 1 ¾ cups sugar until light and fluffy (about 3-5 minutes) using an electric mixer. If you want a soft cake, this step is essential.
- Add Eggs and Vanilla – Beat in 4 eggs, one at a time, then add 1 ½ teaspoons vanilla extract for flavor.
- Combine Wet and Dry Ingredients – Gradually mix the dry ingredients into the wet ingredients, alternating with 1 cup whole milk, starting and ending with dry ingredients. Mix until just combined—do not overmix!
- Pour the Batter into the Pan – Fill the prepared cake pan evenly with batter and smooth the top with a spatula.
🔹 Tip: Tap the cake pan on the counter a few times to release air bubbles for an even bake.
Baking the Cake to Perfection
- Bake the Cake: Put the cake in the oven that has been prepared and bake it for:
- 35-40 minutes for a round 9-inch cake.
- 30-35 minutes if using a Hello Kitty-shaped cake pan.
- To check if the cake is done, stick a toothpick into the middle. If it comes out clean or with a few crumbs (not wet batter), it’s done.
- Cool the Cake – Let the cake cool in the pan for 10 minutes, then transfer it to a wire rack to cool completely before decorating.
🔹 Tip: If you’re in a hurry, place the cake in the fridge for 20 minutes to speed up cooling.
Leveling and Stacking the Cake
For a professional look, it’s important to trim and layer your cake correctly.
- Trim Uneven Tops – If the cake has a domed top, use a serrated knife or a cake leveler to slice off the top for an even surface.
- Slice for Layers (Optional) – If making a layered cake, cut the cake in half horizontally using a long serrated knife.
- Add the Filling – Spread a layer of strawberry jam, raspberry filling, or buttercream frosting between the cake layers for extra flavor.
- Crumb Coat the Cake – Apply a thin layer of buttercream frosting all over the cake to trap crumbs and smooth the surface. Refrigerate for 15-20 minutes before adding the final layer of frosting.
🔹 Tip: A crumb coat helps create a flawless finish for decorating!
Decorating Your Hello Kitty Cake Like a Pro
Now that your cake is baked, cooled, and crumb-coated, it’s time for the most exciting part—decorating your Hello Kitty cake! Whether you’re using buttercream, fondant, or a combination of both, this step-by-step guide will help you create a professional-looking Hello Kitty design.

Covering the Cake with Buttercream or Fondant
Before adding Hello Kitty’s face and details, you’ll need a smooth base layer to make your cake look polished and professional. You can achieve this with either buttercream frosting or fondant—both work well, so choose what you’re most comfortable with.
Option 1: Using Buttercream Frosting
- Prepare Your Buttercream – Whip 1 cup softened butter, 4 cups powdered sugar, 2-3 tablespoons heavy cream, and 1 teaspoon vanilla extract until fluffy and smooth.
- Apply the Final Coat – After the crumb coat has chilled, spread a thick, even layer of white buttercream frosting over the cake using an offset spatula.
- Smooth the Frosting – Use a bench scraper or a spatula to smooth out the surface as much as possible for a clean look.
- Chill the Cake – Refrigerate for 20-30 minutes to set the frosting before adding decorations.
Option 2: Using Fondant for a Smooth Finish
- Roll Out the Fondant – On a clean surface dusted with powdered sugar, roll out white fondant into a large, even circle (about ¼ inch thick).
- Cover the Cake – Carefully drape the fondant over the cake and use your hands or a fondant smoother to press it gently against the cake.
- Trim the Edges – Use a sharp knife to cut off excess fondant around the bottom.
🔹 Tip: If you prefer buttercream but want a fondant look, try using a frosting smoother for a polished finish!
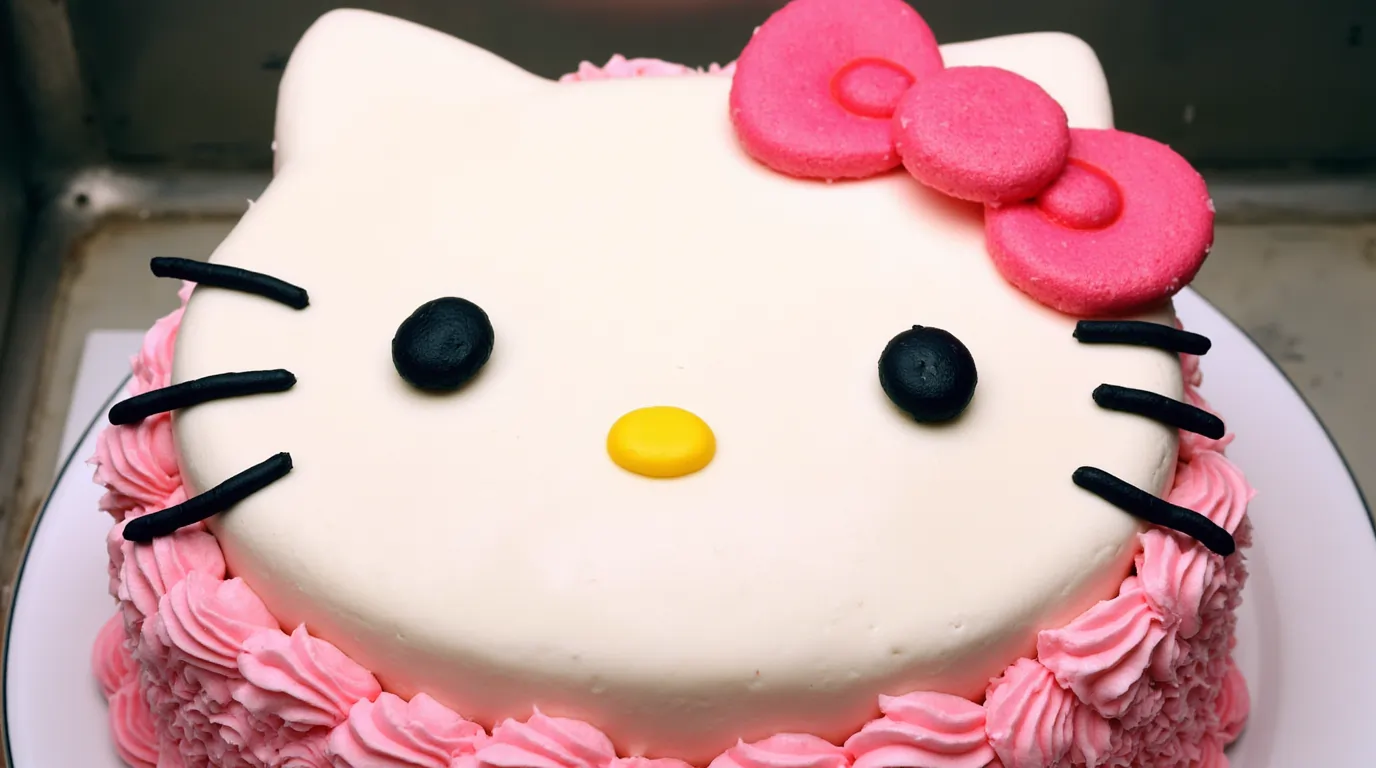
Creating Hello Kitty’s Face and Details
Hello Kitty’s face is simple yet iconic, featuring her cute black eyes, tiny yellow nose, and signature pink bow. You can create these details using fondant, buttercream, or edible markers.
Step 1: Adding Hello Kitty’s Eyes and Nose
- Fondant Method: Roll out two small black fondant ovals for the eyes and a small yellow oval for the nose. Attach them to the cake with a dab of water or edible glue.
- Buttercream Method: Use black buttercream in a piping bag with a small round tip to pipe oval eyes and a small yellow dot for the nose.
- Edible Marker Method: If using fondant as the base, draw the eyes and nose directly onto the surface with black and yellow edible markers.
Step 2: Drawing Hello Kitty’s Whiskers
- Piping Gel or Buttercream Method: Use black piping gel or black buttercream with a fine round piping tip to pipe three whiskers on each side of the face.
- Fondant Method: Roll out thin black fondant strips and attach them with edible glue.
🔹 Tip: If using buttercream, practice on parchment paper before piping onto the cake!
Step 3: Making Hello Kitty’s Signature Bow
Hello Kitty’s pink bow is her signature feature, and you can create it using either fondant or buttercream.
- Fondant Bow:
- Roll out pink fondant and cut out two bow loops and a small rectangle for the center knot.
- Shape the loops slightly by pinching the edges to create dimension.
- Attach the bow to the cake using a dab of water or edible glue.
- Buttercream Bow:
- Use pink buttercream with a medium round tip to pipe two loops and a center knot.
- Smooth with a spatula or leave textured for a fun look.
🔹 Tip: You can also use a Hello Kitty-themed cake topper if you want a quick and easy decoration!
Final Touches for a Stunning Presentation
Now that Hello Kitty’s face is complete, it’s time to add some extra details to make the cake stand out!
- Adding Borders and Piping Designs – Use a star or round piping tip to add a buttercream border along the bottom edge of the cake. This gives a polished finish!
- Sprinkles and Edible Pearls – Add pink or white sprinkles, edible pearls, or glitter around the edges for extra charm.
- Personalized Birthday Message – Use pink or white buttercream to pipe “Happy Birthday [Name]” on the cake board or around the top edge.
- Themed Cake Topper or Candles – Finish the look with a Hello Kitty figurine, themed birthday candles, or a number candle matching the birthday girl’s age.
🔹 Tip: If serving at a party, decorate the table with Hello Kitty-themed plates, napkins, and balloons to complete the look!
Tips for Serving and Storing Your Hello Kitty Cake
Once your Hello Kitty cake is beautifully decorated, it’s time to think about serving and storage. Proper handling ensures your cake looks stunning when presented and stays fresh for as long as possible. Whether you’re preparing the cake in advance or dealing with leftovers, these expert tips will help you keep your cake moist, flavorful, and picture-perfect.

Best Practices for Serving Your Hello Kitty Cake
When it’s time for the big reveal, you want your Hello Kitty cake to be served at its best. Here are some key tips to make sure everyone enjoys a perfect slice:
Bring the Cake to the Right Temperature
- If refrigerated: Take the cake out 30-45 minutes before serving so the buttercream or fondant can soften.
- If frozen: Allow at least 2-3 hours for thawing at room temperature.
Use a Sharp Knife for Clean Slices
- For buttercream cakes, use a sharp, non-serrated knife for clean cuts.
- For fondant-covered cakes, use a sharp knife warmed with hot water to avoid cracking the fondant.
Serve with Complementary Sides
Enhance the cake experience with delicious side pairings:
- Vanilla or strawberry ice cream
- Fresh berries (strawberries, raspberries, or blueberries)
- Whipped cream
- A drizzle of chocolate or caramel sauce
🔹 Tip: If serving at a party, cut the cake into smaller slices for kids and larger pieces for adults.
How to Store Your Hello Kitty Cake for Freshness
Whether you’re storing leftover cake or preparing it in advance, these storage techniques will help maintain its flavor, texture, and appearance.
Storing at Room Temperature (Short-Term)
If you plan to serve the cake within 24 hours, you can leave it at room temperature.
- Keep the cake in a cake carrier or under a large bowl to protect it from dust and drying out.
- Store out of direct sunlight and heat sources in a cool, dry location.
- Avoid storing near strong-smelling foods (like onions or garlic), as cakes can absorb odors.
🔹 Best for: Buttercream-covered cakes or cakes without perishable fillings.
Refrigerating the Cake (For Longer Freshness)
If you need to store the cake for up to 4-5 days, refrigeration is the best option.
- Place the cake in an airtight container or loosely cover it with plastic wrap to prevent it from drying out.
- Store it on a middle shelf, away from items that could cause condensation.
- Before serving, let the cake sit at room temperature for 30-45 minutes to soften.
🔹 Best for: Cakes with perishable fillings (like cream cheese, custard, or fresh fruit).
Freezing the Cake (For Long-Term Storage)
If you need to store the cake for weeks or months, freezing is a great option.
- For whole cakes: Wrap the cake tightly in plastic wrap, followed by aluminum foil to prevent freezer burn.
- For sliced cake: Wrap individual slices in plastic wrap and store them in a freezer-safe container.
- Thaw overnight in the refrigerator or for a few hours at room temperature before eating.
🔹 Best for: Make-ahead cakes or preserving leftovers for later.
Make-Ahead Tips for a Stress-Free Celebration
Want to save time on party day? You can prepare parts of your Hello Kitty cake in advance and assemble it just before serving.
Baking the Cake in Advance
- Bake the cake 1-2 days ahead and store it at room temperature, tightly wrapped in plastic wrap.
- You can also bake it up to a month ahead and freeze it. Just thaw overnight before decorating.
Preparing Frosting and Fondant Early
- Buttercream frosting can be made 2-3 days ahead and stored in the fridge. Just rewhip before using.
- Fondant decorations (like Hello Kitty’s bow and face details) can be made several days ahead and stored in an airtight container at room temperature.
Assembling on the Day of the Party
- Frost and decorate the cake the day before or the morning of the event for best freshness.
- Keep the cake covered and in a cool place until serving time.
🔹 Tip: If you’re transporting the cake, use a cake box or carrier and keep it cool to prevent melting.
FAQs
Is fondant necessary to build a Hello Kitty cake?
Yes! You can use buttercream frosting to decorate the cake instead of fondant. Simply pipe the details using different colored frostings or use chocolate and edible markers for the facial features.
What cake flavors work best for a Hello Kitty cake?
Popular flavors include vanilla, chocolate, strawberry, and red velvet. You can also try fun flavors like lemon or funfetti for a unique twist.
How far in advance can I make the Hello Kitty cake?
You can bake the cake 1-2 days in advance and store it in an airtight container. If you need to prepare earlier, you can freeze the cake for up to a month and decorate it after thawing.
How do I get smooth fondant on the cake?
Roll out the fondant evenly on a surface dusted with powdered sugar. Drape it over the cake carefully and use a fondant smoother to remove air bubbles and wrinkles.
What’s the best way to transport a decorated Hello Kitty cake?
Place the cake in a sturdy cake box or carrier and keep it cool to prevent melting. If traveling long distances, refrigerate the cake beforehand and transport it on a flat surface in the car.
Conclusion
Creating a Hello Kitty cake for a girl’s birthday is a wonderful way to bring joy to a special occasion. From baking the perfect cake base to decorating it like a pro, every step allows you to add a personal touch that makes the celebration even more memorable. Whether you choose buttercream or fondant, the key is to have fun with the process and let your creativity shine.
A Recap of the Key Steps
Let’s quickly go over what we covered:
✔ Gathering Ingredients & Tools – Choosing the right cake flavors, frosting types, and decorating essentials.
✔ Baking the Cake – Following a step-by-step method to ensure a fluffy, moist cake.
✔ Decorating Like a Pro – Bringing Hello Kitty’s signature look to life with fondant or buttercream.
✔ Serving & Storing – Keeping the cake fresh and picture-perfect for the party.
No matter your skill level, this guide has given you everything you need to make a stunning Hello Kitty cake that will impress kids and adults alike.
Personalizing Your Hello Kitty Cake
Want to make your cake even more special? Here are some ideas for personalizing it:
🎀 Try different flavors – Vanilla, chocolate, strawberry, or even red velvet for a fun twist.
🎀 Experiment with colors – Use pastel pinks, purples, or a rainbow design for a unique look.
🎀 Add edible glitter or sprinkles – For extra sparkle and a magical touch.
🎀 Incorporate a themed cake topper – A small Hello Kitty figurine or candles can make the cake extra festive.
Final Thoughts
Baking a Hello Kitty cake is more than just making dessert—it’s about creating a centerpiece for a celebration. Whether it’s for a birthday, baby shower, or special occasion, this cake is sure to be a showstopper that brings smiles all around.
So, grab your ingredients, get creative, and have fun baking! Don’t forget to take plenty of pictures before serving your masterpiece. 🎂🎉
Share Your Experience
There are no reviews yet. Be the first one to write one.