
Bread and butter pickle recipe lovers, get ready to create the perfect balance of sweet, sour, and tangy with this classic homemade version. Whether you’re canning for winter or just craving something crunchy to pair with your sandwiches, this old-fashioned favorite delivers irresistible flavor in every bite.
In this detailed guide, you’ll learn how to master the ultimate bread and butter pickle recipe from scratch — complete with easy ingredient swaps, brining techniques, and storage solutions. Whether you’re a beginner or a canning pro, this is your go-to method for making pickles that stay crisp and flavorful.
What makes this bread and butter pickle recipe stand out? We’ll walk you through all the secrets, from seasoning to slicing — and answer common questions like:
Unlike dill pickles, bread and butter pickles are sweet and tangy thanks to a brine made with sugar, vinegar, and spices like turmeric and mustard seed—no dill involved.
Why are they called bread and butter pickles?
And yes — we’ll even reveal what those mysterious little spice balls are floating in your jar!
So grab your cucumbers, prep your jars, and let’s dive into the crunchy world of sweet pickling!
Table of Contents
Introduction to Bread and Butter Pickles
What are Bread and Butter Pickles?
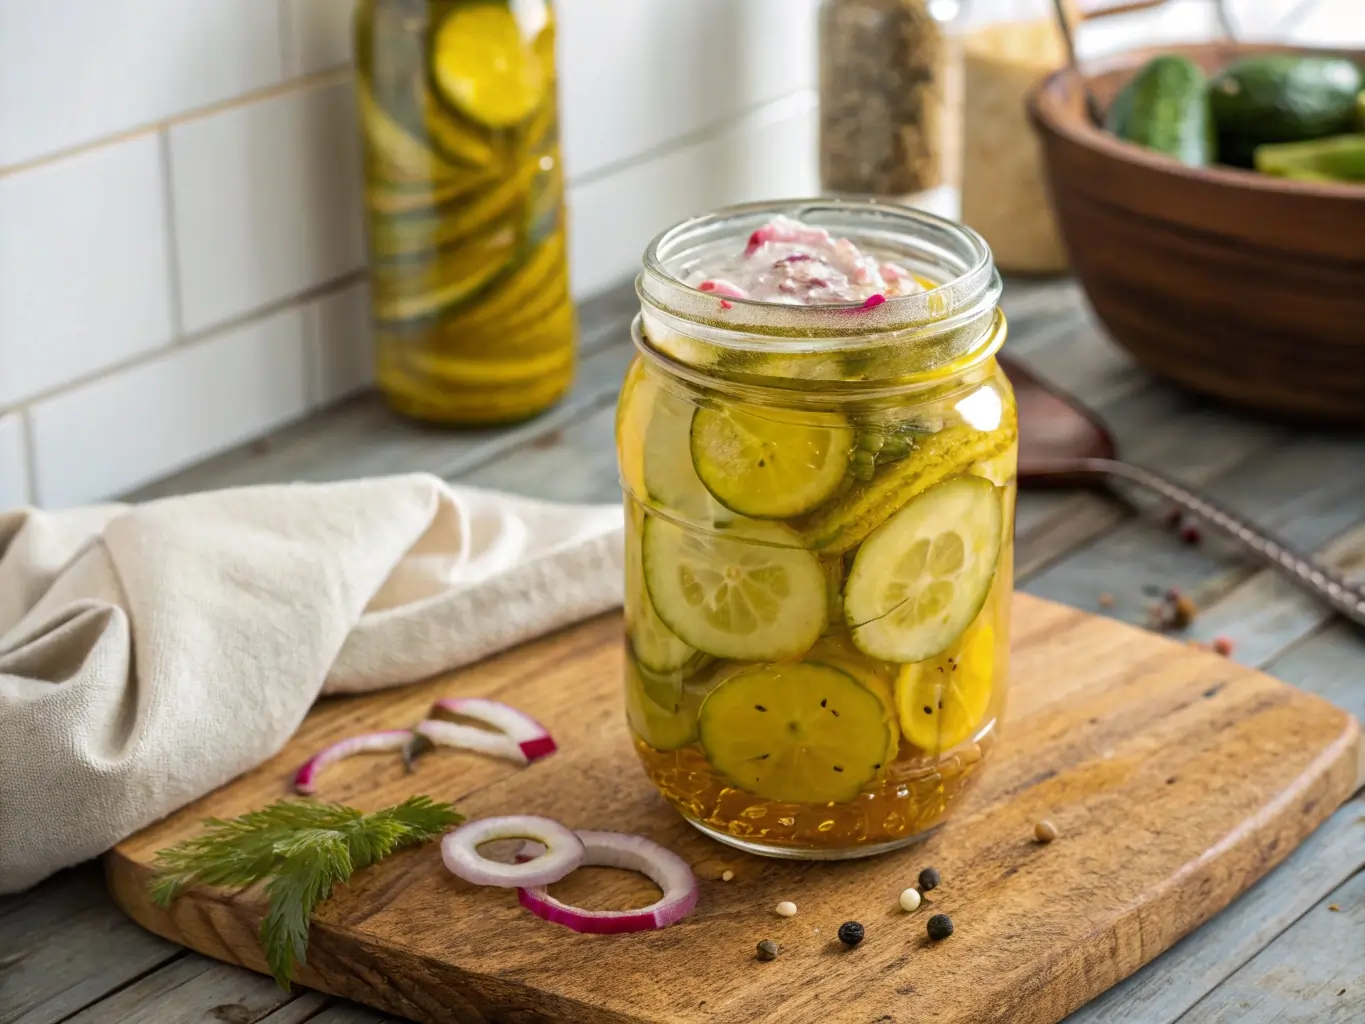
A traditional bread and butter pickle recipe delivers a sweet-and-sour pickle made from thinly sliced cucumbers and onions. These homemade pickles are soaked in a spiced vinegar and sugar brine, giving them their iconic balance of tang and sweetness. Compared to classic dill pickles, bread and butter pickles bring a sugary crunch that complements sandwiches, burgers, charcuterie boards, and more.
The beauty of this bread and butter pickle recipe lies in its simplicity. With minimal ingredients and no fermentation required, it’s ideal for home cooks looking to preserve a harvest or whip up a flavorful batch for the fridge. The result? Crisp, zesty pickles that both kids and adults devour.
History and Origin of Bread and Butter Pickles
Curious why they’re called “bread and butter” pickles? The name comes from the Great Depression era, when these sweet pickles were a simple, affordable sandwich filling—just bread, butter, and pickles. The origin of the name carries a simple charm and a touching glimpse into resilience and resourcefulness. During the Great Depression, when money was tight and cucumbers were plentiful, many families relied on pickling to extend their meals. It’s believed that farmers would trade jars of these pickles for basic groceries — like bread and butter — leading to the name.
Another well-known origin traces back to the 1920s, when Omar and Cora Fanning sold their sweet pickles under the name “bread and butter” to help make ends meet during tough times. To survive financial hardship, the Fannings turned their family recipe into a business—trademarking “Fanning’s Bread and Butter Pickles” and turning pantry staples into profit.
Regardless of its origins, one thing’s clear: the bread and butter pickle has earned its place in pantries across America, becoming a nostalgic, tangy treat passed down through generations.
Ingredients in Bread and Butter Pickle Recipe
Essential Vegetables (Cucumbers, Onions, Peppers)
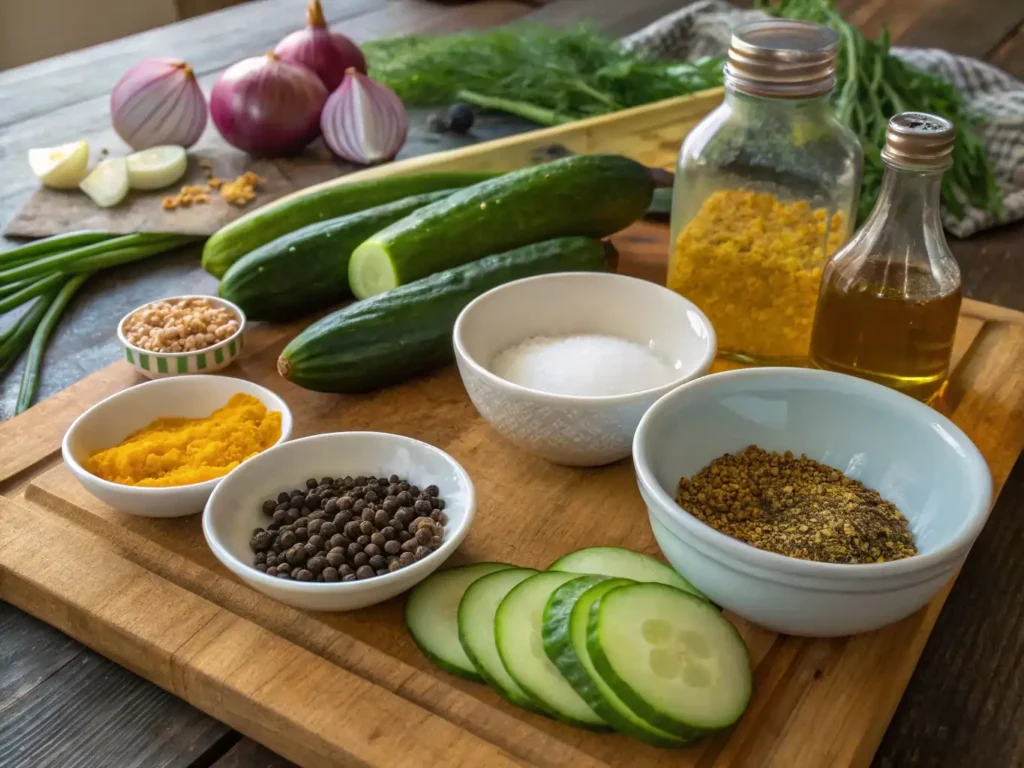
At the heart of every delicious bread and butter pickle recipe is a simple combination of fresh, crunchy vegetables. Choosing the right produce is key to ensuring your pickles stay crisp and flavorful.
Cucumbers: Go for pickling cucumbers like Kirby or Boston Pickling variety. These are smaller, firmer, and have thinner skin, which helps them absorb the brine better without getting soggy.
Onions: Sweet onions or yellow onions add just the right amount of sharpness and depth to your pickles. Thin slices meld well with the cucumbers and balance the sweetness of the brine.
Bell Peppers (Optional): Some variations of the recipe include thinly sliced green or red bell peppers. They not only add crunch and color but also a mild fruity bite that complements the pickles perfectly.
To get consistent slices and faster prep time, consider using a mandoline slicer — it ensures even thickness, which helps with flavor absorption and presentation. It’s a helpful tool when prepping large batches of your favorite bread and butter pickle recipe for canning or gifting.
Vinegar and Sweetener Choices
The brine is where the magic happens. It’s what transforms ordinary cucumbers into the crave-worthy pickles everyone loves. For a true-to-tradition bread and butter pickle recipe, here’s what you’ll need:
- Vinegar: The classic choice is white distilled vinegar, which keeps the pickles brightly colored and sharp. For a mellower flavor, try apple cider vinegar — just ensure it has at least 5% acidity to keep the pickles safe for canning.
- Sugar: Granulated white sugar is most commonly used. It brings out the “butter” part of bread and butter pickles — that unmistakable sweetness. Adjust the sugar to your taste if you prefer a less sweet version.
- Salt: Stick with pickling salt or kosher salt. Avoid table salt, which contains anti-caking agents that can cloud your brine.
Here’s a quick breakdown:
| Ingredient | Purpose |
|---|---|
| White vinegar (5%) | Sharp acidity, preserves pickles |
| Apple cider vinegar | Milder, fruity note |
| Granulated sugar | Sweetens and balances the vinegar |
| Pickling salt | Draws out moisture and preserves crunch |
What Seasoning is in Bread and Butter Pickles?
A hallmark of every great bread and butter pickle recipe is its warm, spiced aroma. That flavor comes from a carefully chosen blend of pickling spices. Here are the essentials:
- Mustard Seeds: These are the little yellow or brown balls you see floating in the brine — they offer subtle heat and a slight pop in texture.
- Celery Seed: Adds a savory herbal note.
- Ground Turmeric: Provides the signature golden color and earthy depth.
- Cloves (Optional): A single clove can add a warm, aromatic spice. Don’t overdo it — a little goes a long way.
- Red Pepper Flakes (Optional): For a spicy twist, add 1/4 tsp to give your pickles some heat.
You can buy pre-made pickling spice blends, but customizing your own gives you more control over the final flavor. If you’re canning, it’s best to place the spices in a spice bag or cheesecloth for easy removal before sealing. These small details help elevate your bread and butter pickle recipe from good to unforgettable.
Equipment and Preparation Tips
Tools You Need for Pickling at Home
Making a bread and butter pickle recipe from scratch doesn’t require expensive gear — but having the right tools makes the process smoother, safer, and far more efficient. Whether you’re new to pickling or upgrading your kitchen setup, here are the essentials you’ll need:
- Mandoline Slicer: Ideal for getting uniform, thin cucumber and onion slices. Consistency in size ensures even brining and a better texture.
- Large Non-Reactive Pot: Stainless steel or enamel-coated pots are perfect for heating the brine. Avoid aluminum or cast iron as they can react with the vinegar.
- Canning Funnel: Helps you pour hot brine into jars neatly, preventing spills and burns.
- Jar Lifter: Crucial for safely removing hot jars from a boiling water bath.
- Ladle: For transferring brine into the jars quickly and evenly.
- Clean Towels or Paper Towels: Wipe jar rims to ensure a proper seal before applying the lids.
- Canning Jars (Mason or Ball Jars): Choose pint or half-pint jars with new two-piece lids (lid + band).
These tools aren’t just helpful for pickling — they’ll come in handy for sauces, jams, salsas, and other home-preserved goodies. If you plan to make your bread and butter pickle recipe more than once, investing in a basic canning kit will save you time and hassle.
Prepping and Slicing Tips for Uniform Pickles
Preparation is everything when making pickles that are crisp, evenly seasoned, and visually appealing. Here are practical tips to elevate your bread and butter pickle recipe from average to professional-grade:
1. Choose Fresh, Firm Produce
Begin with freshly harvested cucumbers—deep green, crisp to the touch, and without any signs of bruising or softness. Steer clear of grocery store cucumbers with wax coatings—they repel the brine and won’t soak up flavor properly.
2. Salt Soak Your Vegetables
Soaking the sliced cucumbers and onions in salt water (brine) for 1–2 hours before pickling helps remove excess moisture. This step is crucial for preserving that classic crunch.
Quick Salt Soak Tip:
Toss sliced cucumbers and onions with 1/4 cup of pickling salt, cover with ice cubes, and refrigerate for 2 hours. Then rinse and drain well before adding to hot brine.
3. Slice Consistently
Using a mandoline ensures every slice is the same thickness — around 1/4 inch is perfect. Uneven slices can lead to soggy pickles or under-flavored ones.
4. Sterilize Your Jars
Even if you’re not canning long-term, sterilizing jars ensures your bread and butter pickle recipe stays safe and fresh. Boil jars for 10 minutes or run them through a dishwasher cycle on high heat with no detergent.
5. Don’t Skip the Air Bubble Check
After pouring the brine into jars, run a clean utensil or skewer around the inside edge to release any air pockets. This ensures a tighter seal and locks in the pickle’s fresh, tangy taste.
Step-by-Step Bread and Butter Pickle Recipe
How to Make the Brine
The brine is the backbone of any great bread and butter pickle recipe. It’s what gives your pickles that irresistible combination of sweet, tangy, and spicy. Making it right is essential — and surprisingly simple.
Here’s a classic brine base:
Brine Ingredients (for approx. 6 pint jars):
- 2 cups white distilled vinegar (5% acidity)
- 1 ¾ cups granulated sugar
- 2 tablespoons mustard seeds
- 1 ½ teaspoons celery seed
- 1 teaspoon ground turmeric
- 1 teaspoon crushed red pepper flakes (optional, for heat)
- 1 tablespoon pickling salt
Instructions:
- In a large, non-reactive pot, combine vinegar, sugar, and all spices.
- Bring the mixture to a simmer over medium heat, stirring until the sugar dissolves.
- Once it reaches a gentle boil, reduce heat to low and keep it hot until ready to pour over your sliced cucumbers and onions.
This brine will infuse your cucumbers with bold, complex flavors that balance sweetness with just enough acidity to preserve and punch through. This is the part of the bread and butter pickle recipe that determines flavor intensity and shelf life, so don’t cut corners.
Heating and Canning Instructions
Whether you’re going the refrigerator route or full canning, follow these steps for safe, crisp, and shelf-stable results.
1. Prepare the Vegetables
- Slice 6 cups of pickling cucumbers and 2 cups of sweet onions thinly (1/4 inch thick).
- Place them in a bowl, sprinkle with 1/4 cup pickling salt, add a layer of ice, and refrigerate for 2–3 hours.
- Rinse well and drain thoroughly before packing into jars.
2. Sterilize the Jars
- Clean the jars thoroughly with warm soapy water or place them in the dishwasher on a detergent-free cycle to prep for pickling.
- To sterilize, fully immerse the jars in boiling water for 10 minutes to eliminate any lingering bacteria. Keep warm until ready to use.
- Boil lids and bands separately, then remove with tongs.
3. Fill the Jars
- Layer cucumbers and onions into each sterilized jar, packing tightly but leaving 1/2-inch headspace.
- Gently pour the hot brine into each jar, making sure the vegetables are fully submerged for optimal pickling.
- Slide a non-metal utensil around the inside of the jar to release trapped air, then top off with brine to maintain proper headspace.
- Wipe the rims clean, then apply lids and screw on bands until just finger-tight.
4. Water Bath Canning (For Shelf Storage)
- Bring a large canning pot of water to a rolling boil.
- Place the filled jars into the canner, making sure they’re covered by at least an inch of water for safe processing.
- Boil the jars for 10 minutes, adjusting the time based on your altitude if needed for proper preservation.
- Gently remove the jars and set them on a towel-covered surface, letting them cool completely for 12 to 24 hours without disturbance.
Check the Seal:
Once cooled, press the center of each lid — it should not flex. Keep sealed jars in a dark, cool spot—like a pantry or cellar—for up to a year of shelf-stable freshness. This ensures your homemade bread and butter pickle recipe stays safe, fresh, and flavorful for long-term enjoyment.
5. Refrigerator Method (For Short-Term Use)
Skipping the canning step? Just let the jars cool to room temp, then pop them in the fridge for short-term enjoyment. Your pickles will be crisp and flavorful within 1 to 2 days and can stay delicious in the fridge for up to two months.
Quick Reference Table
| Step | Details |
|---|---|
| Soak veggies | Salt and ice soak, 2–3 hours |
| Prepare brine | Vinegar, sugar, mustard seeds, turmeric |
| Pack jars | Layer cucumbers and onions, add hot brine |
| Remove air bubbles | Use a clean spatula or chopstick |
| Process (water bath) | 10 minutes boiling, then cool 24 hrs |
| For fridge pickles | Cool jars, refrigerate, use within 2 months |
This part of your bread and butter pickle recipe is where flavor meets technique — and with the right method, you’ll enjoy pickles that are crunchy, sweet, and perfectly spiced every single time. Whether you store them for months or devour them in a week, the reward is in every bite.
Variations of Bread and Butter Pickle Recipe
One of the best things about a good bread and butter pickle recipe is its flexibility. With just a few tweaks, you can customize it to match your taste preferences — from extra spicy to sugar-free or refrigerator-ready options. Here are some of the most popular and easy-to-make variations.
Spicy Bread and Butter Pickles
If you like a little heat with your sweet, this variation is for you. Adding spice transforms a classic bread and butter pickle recipe into something bold and exciting.
What to Add:
- 1 to 2 teaspoons crushed red pepper flakes
- 1 to 2 sliced jalapeños or serrano peppers
- Optional: A pinch of cayenne for real fire
How to Do It:
Add the pepper flakes or sliced chilis directly into the brine while it’s simmering. If using fresh peppers, layer them with the cucumbers and onions in the jar. The result is a spicy-sweet flavor combo that’s amazing on burgers or BBQ sandwiches.
Refrigerator Bread and Butter Pickles (No Canning Needed)
Don’t want to deal with water baths or sterilizing lids? Try the refrigerator bread and butter pickle recipe instead. It’s fast, easy, and perfect for beginners or small-batch use.
Key Differences:
- No canning or water bath required
- Store in the fridge only
- Shorter shelf life (4–8 weeks)
Steps:
- Prepare your cucumbers and onions as usual.
- Heat the brine and pour it over the vegetables packed in clean jars.
- Let jars cool, then refrigerate for at least 24 hours before eating.
These speedy pickles pack a crunchy, zesty punch—and they’re ready to enjoy in just 24 hours. They’re ideal for weeknight meals or gifting to friends and family.
Sugar-Free or Keto-Friendly Bread and Butter Pickles
Looking for a low-carb or diabetic-friendly version? You can absolutely adapt a bread and butter pickle recipe to meet your health goals.
Sugar Substitutes That Work:
- Stevia or monk fruit (use sparingly — they’re potent)
- Erythritol or xylitol for a more traditional texture and taste
Tips:
- Make a small batch first to test flavor balance
- Avoid artificial sweeteners with strong aftertastes
- Stick with the refrigerator method for best results
The texture and flavor may vary slightly from traditional versions, but it’s still possible to enjoy that iconic sweet-tangy flavor without the sugar crash.
Bread and Butter Pickles with Extra Veggies
Want to add color or variety? This version of the bread and butter pickle recipe includes other fresh veggies that pickle beautifully.
Try adding:
- Sliced carrots
- Thin strips of red bell peppers
- A handful of cauliflower florets
Tossing in extra veggies boosts the texture, brightens the jar, and soaks up all that flavorful brine. You’ll love how they taste in sandwiches or as a side for grilled meats.
Quick Variation Chart
| Variation | Key Additions | Best Use |
|---|---|---|
| Spicy | Red pepper flakes, jalapeños | Burgers, BBQ |
| Refrigerator | No canning needed, just chill | Quick use, gifts |
| Sugar-Free/Keto | Monk fruit, erythritol, stevia | Low-carb diets, diabetics |
| Extra Veggies | Carrots, bell peppers, cauliflower | Party platters, snacking |
These variations prove that the classic bread and butter pickle recipe is far from one-size-fits-all. Whether you’re dialing up the heat, skipping the sugar, or just simplifying the process, there’s a pickle version that’s perfect for your lifestyle.
Bread and Butter Pickle Storage and Shelf Life
After you’ve nailed your perfect bread and butter pickle recipe, proper storage is the key to keeping your pickles crisp, flavorful, and safe to eat. Whether you’re canning for long-term use or storing in the fridge for a few weeks, how and where you store your pickles matters.
How Long Do Homemade Pickles Last?
The shelf life of your bread and butter pickle recipe depends on the method used for preservation:
| Pickling Method | Shelf Life | Storage Tips |
|---|---|---|
| Water bath canning | 9 to 12 months | Store in a cool, dark pantry; check seals |
| Refrigerator pickles | 4 to 8 weeks | Keep in airtight jars; always refrigerate |
| Unsealed canned jars | Use within 1 week | Refrigerate immediately and monitor freshness |
Important Reminder:
Always check for signs of spoilage. If your pickles develop mold, strange odor, or slimy texture, discard them immediately.
Best Storage Containers and Conditions
Not all jars and lids are created equal. Using the right materials ensures your pickles last longer and stay tasting just as you intended.
Recommended Storage Containers:
- Use mason jars equipped with classic two-piece lids—a flat sealing disc paired with a screw-on metal band.
- Glass jars with rubber gaskets and metal clamps
- BPA-free food-safe plastic containers (for refrigerator pickles only)
Avoid using old jars with nicks or scratched lids. Even a tiny flaw can compromise the seal, shortening the life of your bread and butter pickle recipe.
Storage Conditions:
- For long-term storage, keep canned pickles in a cool, dark spot—ideally between 60–70°F—to maintain peak flavor and safety.
- For refrigerator pickles: Keep sealed and always store below 40°F.
- Avoid direct sunlight or heat exposure — both can degrade flavor and texture.
Tips to Extend Shelf Life
Here are a few pro tricks to stretch the life of your homemade pickles:
- Use fresh ingredients – Overripe cucumbers spoil faster.
- Sterilize everything – Jars, lids, funnels, and ladles should all be sanitized.
- Keep vegetables fully submerged – Air exposure leads to spoilage.
- Label your jars – Include the recipe version and date canned for easy tracking.
Bonus Tip:
The longer your pickles sit (especially canned ones), the more flavorful they become. That’s why many people store their bread and butter pickle recipe jars for 4–6 weeks before opening for peak flavor.
Proper storage isn’t just about keeping pickles edible — it’s about preserving the effort and flavor you worked hard to achieve. Whether you’re saving jars for winter or prepping fridge pickles for weekly meals, these tips ensure your results last.
Serving Suggestions & Pairings
You’ve mastered the bread and butter pickle recipe, but now you’re probably wondering — what do I serve these with? The good news: these sweet and tangy pickles are wildly versatile. From sandwiches to charcuterie boards, they’re the perfect finishing touch to dozens of dishes.
Best Foods to Serve with Bread and Butter Pickles
Bread and butter pickles aren’t just for sandwiches — though they certainly shine there. Here are the top ways to make your pickles the star of the meal:
1. Classic Sandwiches & Burgers
These pickles add a crisp, sweet contrast to savory meats and melted cheese. Add them to:
- Cheeseburgers
- Turkey clubs
- Pulled pork sliders
- Grilled cheese
Pro Tip: Spread a little Dijon mustard on the bread and layer in a few slices of your bread and butter pickle recipe creation for an epic flavor combo.
2. Barbecue & Grilled Meats
Bread and butter pickles cut through rich, smoky BBQ flavors with their sweet tang, adding a refreshing lift to heavier meats. Serve them on the side of:
- Smoked brisket
- BBQ ribs
- Grilled sausages
- Fried chicken
Try adding them directly into a BBQ pulled pork sandwich for a sweet crunch that cuts through the richness.
3. Charcuterie Boards & Snack Platters
The sweet-tart flavor and vibrant color of bread and butter pickles makes them perfect for:
- Charcuterie or cheese boards
- Holiday appetizer trays
- Picnic snack packs
Pair them with sharp cheeses like cheddar or creamy goat cheese, alongside cured meats like prosciutto or salami.
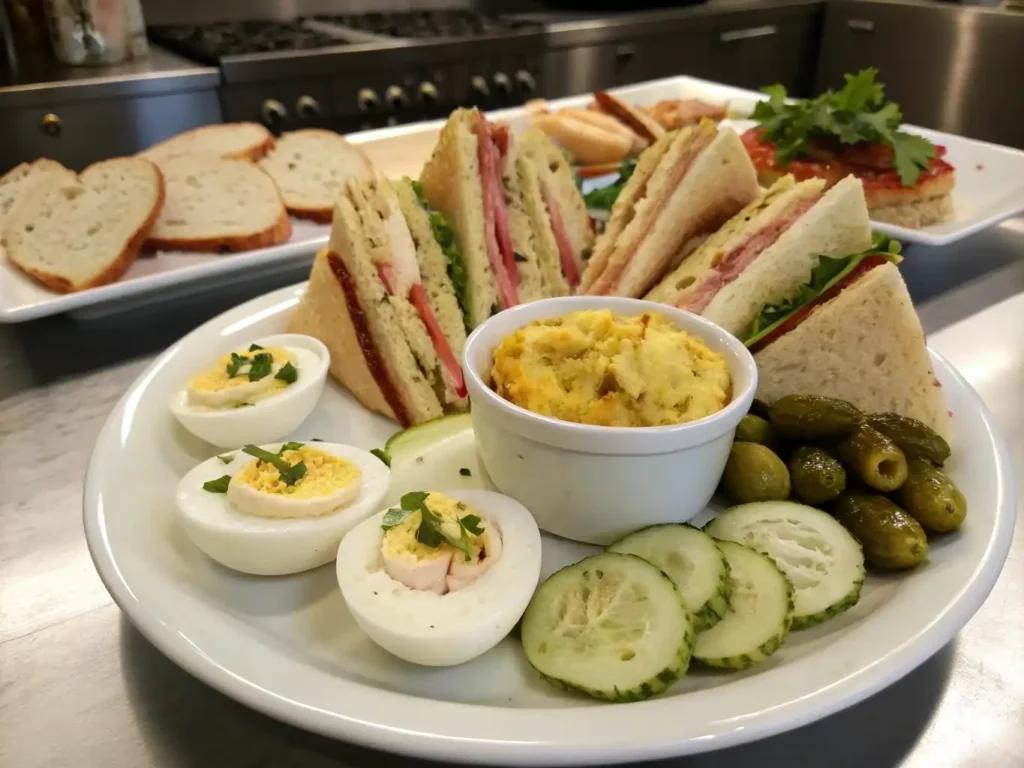
4. Egg Salad, Tuna Salad & Deviled Eggs
The slight crunch and sweetness of these pickles make them perfect as an ingredient or garnish for:
- Egg salad sandwiches
- Tuna salad
- Deviled eggs
Dice them up and mix them in for a surprising burst of flavor and texture — a true upgrade powered by your homemade bread and butter pickle recipe.
Using Pickles in Salads and Side Dishes
You can go beyond the jar by incorporating your bread and butter pickle recipe into other dishes. Try these ideas:
- Potato Salad: Add chopped pickles to give classic potato salad a sweet-and-zesty upgrade.
- Pasta Salad: A few slices can transform a mayo-based or vinaigrette pasta salad into something special.
- Coleslaw: Mix in chopped pickles or even a splash of brine to brighten up the dressing.
- Cucumber Salad Remix: Toss crisp cucumbers with sliced pickles, red onion, and a sprinkle of fresh dill for a zesty, flavor-loaded side dish.
Creative Uses You May Not Have Tried
- Bread and Butter Pickle Dip: Chop them up and mix with sour cream and cream cheese for a unique chip dip.
- Pickle Grilled Cheese: Add a few slices between your bread and cheese before toasting — tangy, crunchy perfection!
- Bloody Mary Garnish: Use a pickle slice or spear to add a sweet contrast to spicy tomato juice.
Table: What to Pair With Bread and Butter Pickles
| Food | Why It Works |
|---|---|
| Cheeseburgers | Adds sweet crunch and balances savory flavors |
| Pulled pork or brisket | Cuts through fatty richness |
| Egg salad or deviled eggs | Boosts flavor with zesty contrast |
| Cheese and meat boards | Enhances saltiness of cured meats and cheeses |
| Coleslaw or potato salad | Brings sweetness and brightness |
| Bloody Mary cocktails | Fun, flavorful garnish |
With their bold flavor and craveable crunch, bread and butter pickles aren’t just a condiment — they’re a full-on flavor upgrade. However you serve them, they’ll steal the spotlight.
Troubleshooting and Tips
Even the best bread and butter pickle recipe can run into a few snags. From soft pickles to mysterious floating bits in the jar, we’ve seen it all. Luckily, most of these issues are easy to fix — or even prevent entirely. Below are the most common problems people face when making bread and butter pickles, along with practical solutions and pro tips.
What Are the Little Balls in Bread and Butter Pickles?
If you’ve noticed small yellow or brown balls floating in your pickle jar, don’t worry — it’s not contamination. Those tiny golden balls? Mustard seeds—an essential spice that gives classic bread and butter pickle recipe their signature tang and warmth. They add a mild heat and tangy depth to the brine, giving your pickles part of their signature flavor.
Other similar-looking particles may be:
- Celery seeds, which give a savory edge
- That grainy layer at the bottom? It’s just turmeric sediment—a natural result of the spice settling during pickling.
- Pepper flakes or spices that float after boiling
These are normal parts of the brining process — no need to strain or remove them unless you prefer a clear brine.
Why Are My Pickles Mushy?
Soft or mushy pickles are one of the most common complaints when following a bread and butter pickle recipe, and they usually come down to one of the following causes:
| Cause | How to Fix It |
|---|---|
| Using overripe cucumbers | Pick small, firm cucumbers only |
| Not salting or soaking properly | Always do a salt-and-ice soak for 2–3 hours |
| Low-acidity vinegar | Use vinegar with at least 5% acidity |
| Over-processing in water bath | Stick to 10 minutes and remove jars promptly |
Pro Tip:
You can also add a small piece of grape leaf, horseradish leaf, or alum (food-grade) to each jar. These natural additives contain tannins that help keep pickles extra crunchy.
Why Is My Brine Cloudy?
A slightly cloudy brine is usually harmless, but it can sometimes signal a problem.
- Safe Cloudiness: Caused by ground spices, turmeric, or minerals in hard water.
- Problematic Cloudiness: Accompanied by fizzing, gas bubbles, or off smells — this could mean bacterial contamination.
How to Avoid It:
- If your tap water is mineral-rich or hard, switch to distilled water for clearer brine and better flavor
- Filter out spice particles before canning if you prefer clear brine
- Always use clean, sterilized jars and utensils
How Do I Fix Overly Sweet or Vinegary Pickles?
Sometimes you follow a bread and butter pickle recipe and still end up with pickles that are too sweet or too sour. Here’s what to do:
- Too Sweet? Add extra vinegar, a pinch of salt, or toss in a few dill sprigs next time to balance flavors.
- Too Tangy? Slightly increase sugar in your next batch, or add sweet onions or bell peppers to mellow the acidity.
If you’re making refrigerator pickles, you can open the jar and adjust — just bring the brine back to a simmer, tweak it, and pour it back in.
Other Helpful Pickling Tips
- Label Your Jars: Always include the date and variation name.
- Store Unopened Jars in a Cool, Dark Place: Heat and light reduce shelf life.
- Let Pickles Sit: For best flavor, wait at least 2 weeks before opening canned pickles.
- Avoid Iodized Salt: It causes cloudiness and off-flavors.
Troubleshooting is just part of the learning curve. The more often you make your own bread and butter pickle recipe, the better your technique and results will be — and soon enough, you’ll be customizing jars like a pro.
For more recipes, follow me on Facebook and Pinterest.
FAQs
What Makes Bread and Butter Pickles Different?
Bread and butter pickles are distinct from other types like dill or kosher pickles because of their sweet and tangy profile. They’re made using sugar and vinegar, along with spices like mustard seed, turmeric, and celery seed. This gives them a sweeter, spiced flavor compared to the savory, garlic-heavy taste of dill pickles.
They’re also typically sliced thin and used more often as toppings or condiments — think sandwiches, burgers, or charcuterie — whereas dill pickles are commonly enjoyed as spears or whole snacks.
What Seasoning Is in Bread and Butter Pickles?
The seasoning mix in a bread and butter pickle recipe is what gives these pickles their signature taste and golden hue. Most recipes include:
Mustard seeds: The tiny balls you see floating in the jar
Celery seeds: Adds herbal depth
Ground turmeric: Gives the pickles their classic yellow tint
Red pepper flakes: Optional, for heat
Cloves or allspice: Optional, for warmth and aroma
These spices simmer with vinegar and sugar to create a flavorful brine that penetrates every slice of cucumber and onion.
What Are the Little Balls in Bread and Butter Pickles?
The tiny yellow or brown spheres floating in the jar are mustard seeds. They’re one of the key seasonings used in a bread and butter pickle recipe, providing mild heat and a pop of texture. They’re 100% edible and contribute to the unique flavor profile of this type of pickle.
In some variations, you might also see celery seeds or whole peppercorns — all are safe and add complexity to the brine.
Why Do They Call Them Bread and Butter Pickles?
The name has humble, historical roots. During the Great Depression, many families used cucumbers to make pickles as a way to stretch meals. The story goes that these pickles were so common, they were eaten with bread and butter sandwiches — a simple, affordable meal.
Another version credits Omar and Cora Fanning, who trademarked “Fanning’s Bread and Butter Pickles” in the 1920s. They reportedly bartered jars of the pickles for bread and butter, which inspired the catchy name.
Either way, the term stuck — and it now represents a sweet, tangy pickle that has become an American pantry classic.
Share Your Experience
There are no reviews yet. Be the first one to write one.